In the dynamic world of e-commerce, Shopify Hydrogen has emerged as a game-changer. This React-based framework empowers developers to create custom, high-performance storefronts with ease. However, choosing the right hosting platform for your Hydrogen project is crucial to ensure optimal performance, scalability, and reliability. This article explores various hosting options and provides step-by-step guides for deploying your Shopify Hydrogen storefront to each platform.
I. What is Hosting?
Hosting or web hosting is a data storage space divided from servers, helping to upload data and publish websites and apps on the Internet. When you sign up for a hosting service, you are renting a space to store all the necessary files and data on the server so that the website can operate 24/7. Many developers and businesses prefer different hosting solutions based on their needs. Shopify developers, in particular, look for hosting that seamlessly integraes with Hydrogen, offers scalability, and ensures high performance.
II. Hosting Options for Shopify Hydrogen
A variety of hosting solutions are chosen by developers and businesses depending on what they need. For instance, Shopify developers seek a hosting solution that integrates with Hydrogen in a way that is seamless, is scalable, and offers high performance. Developers who use Shopify Hydrogen are provided with the necessary tools to build individual fast-loading storefronts according to their specific business needs: this ensures that the store performs optimally and customers have an easy time shopping at the store. So, to deploy Shopify Hydrogen, you can use hosting providers such as: Oxygen, Vercel, Netlify, Fly.io, Cloudflare.
2.1. How to deploy Shopify hydrogen to Oxygen
Oxygen is Shopify’s platform for hosting Hydrogen storefronts. It offers seamless integration, optimized performance, and an easy deployment process. Here’s how to deploy Shopify Hydrogen to Oxygen:
Step 1: Install the Hydrogen App
- Visit Sales Channels in your Shopify admin.
- Choose the dropdown “>”, select "All recommended sales channels.
- Click “Hydrogen” under “Build custom storefronts."
- Click"Install".
Step 2: Create Hydrogen Storefront
- In your Shopify admin, Click “Hydrogen”.
- Click “Create storefront”.
- Choose "Connect existing repository”.
- Select your GitHub account and Hydrogen app repository.
- Click "Continue" and follow any further prompts.
Step 3: Configure Deployment Workflow
- Oxygen uses a GitHub Action for deployments, typically found in the .github/workflows/oxygen.yml file in your repository.
- Ensure its settings in the workflow, file match your needs, including environment variables and deployment paths.
Step 4: Deploy and Preview
- Push changes to the main branch of your GitHub repository.
- Oxygen automatically deploys your app and generates a preview URL.
- Use the preview URL to test and your changes before merging to production.
Step 5: Merge to Production
- Create a pull request and merge it to the main branch after thoroughly testing your work.
- Oxygen automatically deploys the merged version to your live store.
- These steps outline the process for deploying a Shopify Hydrogen store using Shopify Oxygen, ensuring a seamless integration and deployment experience.
Read more:
Oxygen hosting cost
It is available to merchants on the Basic, Shopify, Advanced and Shopify Plus plan. Unlike other hosting solutions, such as Vercel or Netlify, Oxygen does not incur additional costs for the hosting itself, bandwidth or storage usage. The hosting price is already included in the Shopify plan.
2.2. How to deploy Shopify Hydrogen to Vercel
Vercel is a cloud platform for static sites and serverless functions. It allows developers to build and deploy web projects with ease. With Vercel, you can deploy your project to the cloud and get a global CDN, custom domains, and automatic HTTPS. Here’s how to deploy Shopify Hydrogen to Vercle:
Step 1: Prepare Project
- In root folder, rename server.ts to server-dev.ts for development purpose
- Create a new server.ts file
Step 2: Update Configuration
- Update remix.config.ts
Step 3: Modify Environment Variables
- Update the remix.env.d.ts
Step 4: Update Session Settings
- Update app/lib/session.server.ts
Step 5: Deploy to Vercel
- Create a new project on Vercel and link it to your Hydrogen repository.
- Define the build commands and settings in the Vercel dashboard.
- Push changes to your repository, triggering Vercel’s build and deploy process.
Read more:
Vercel hosting cost
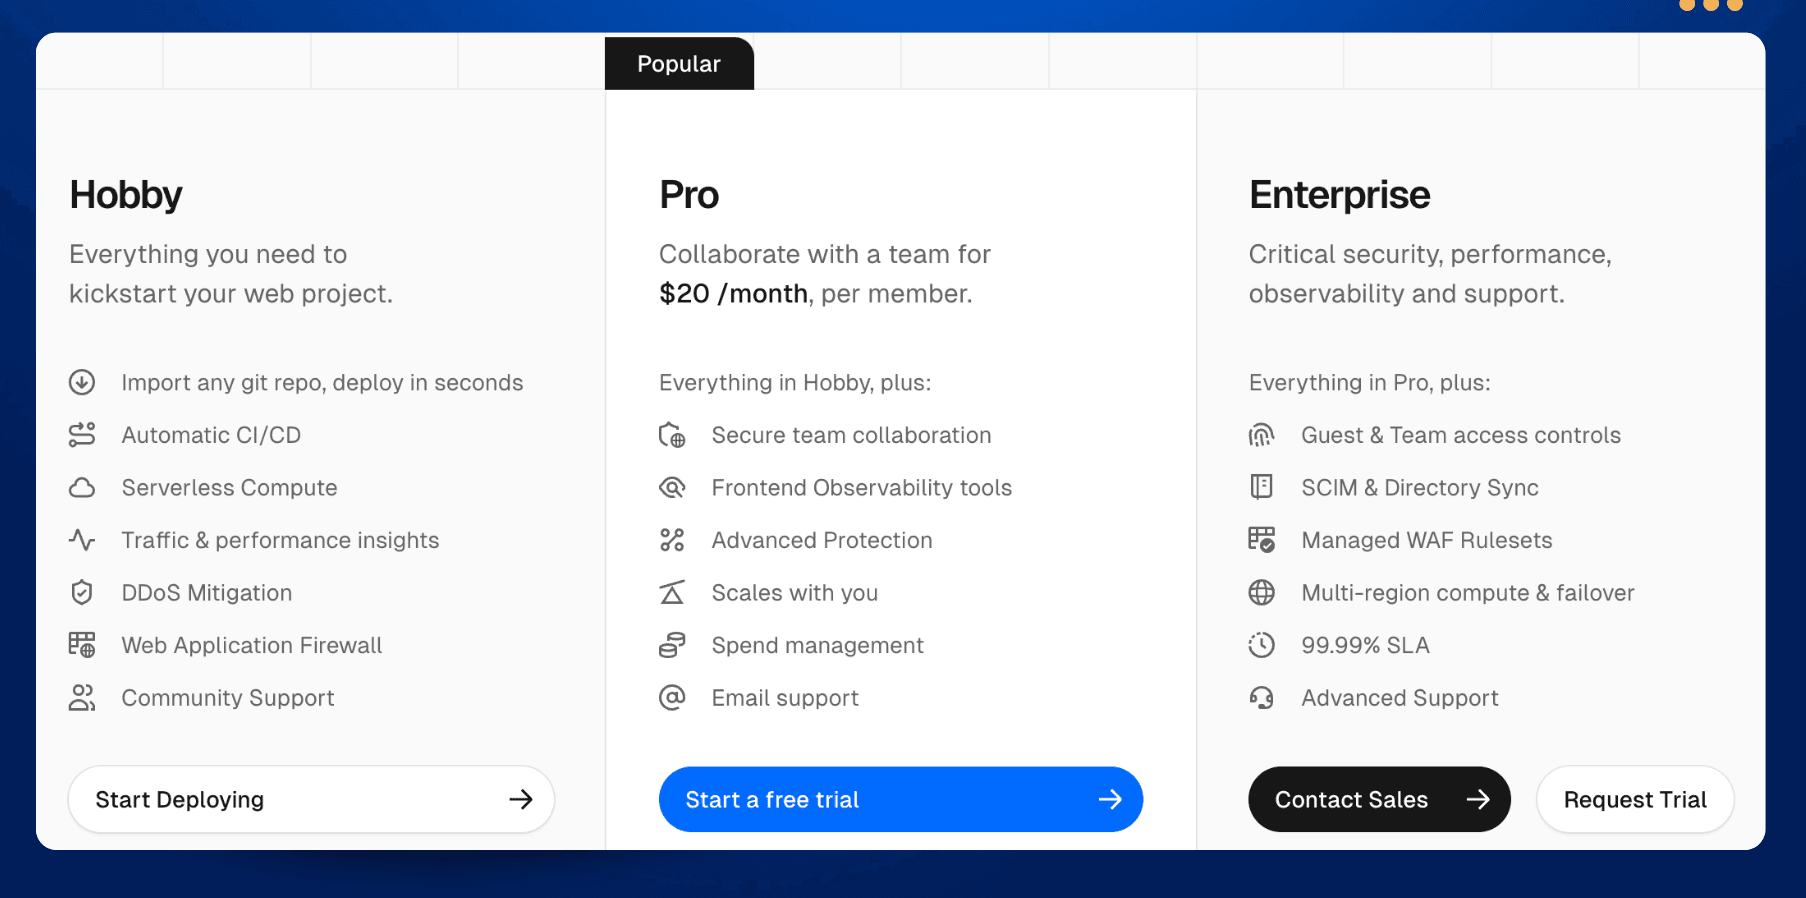
Offers a free tier with basic features, and premium plans start at $20/month, scaling with usage and advanced features.
2.3. How to deploy Shopify hydrogen to Netlify
Netlify is widely preferred to deploy the most recent web applications mainly because of its simplicity, continuous deployment and the fact that it comes with a global content delivery network (CDN). Here’s how to deploy Shopify Hydrogen to Netlify:
Step 1: Set Up the Project
- Clone the Hydrogen Netlify starter repositor: https://github.com/netlify/hydrogen-netlify-starter
- Navigate to the repository folder: cd hydrogen-netlify-starter
- Edit hydrogen.config.js and replace the storeDomain and storefrontToken with your Shopify store’s domain and Storefront API token.
Step 2: : Install Dependencies
- Install the package :

Step 3: Run the Development Server
- Start the application:

Step 4: Build for Production

Step 5: Preview the Production Build
-
Build your Hydrogen app:

-
Run the preview command:

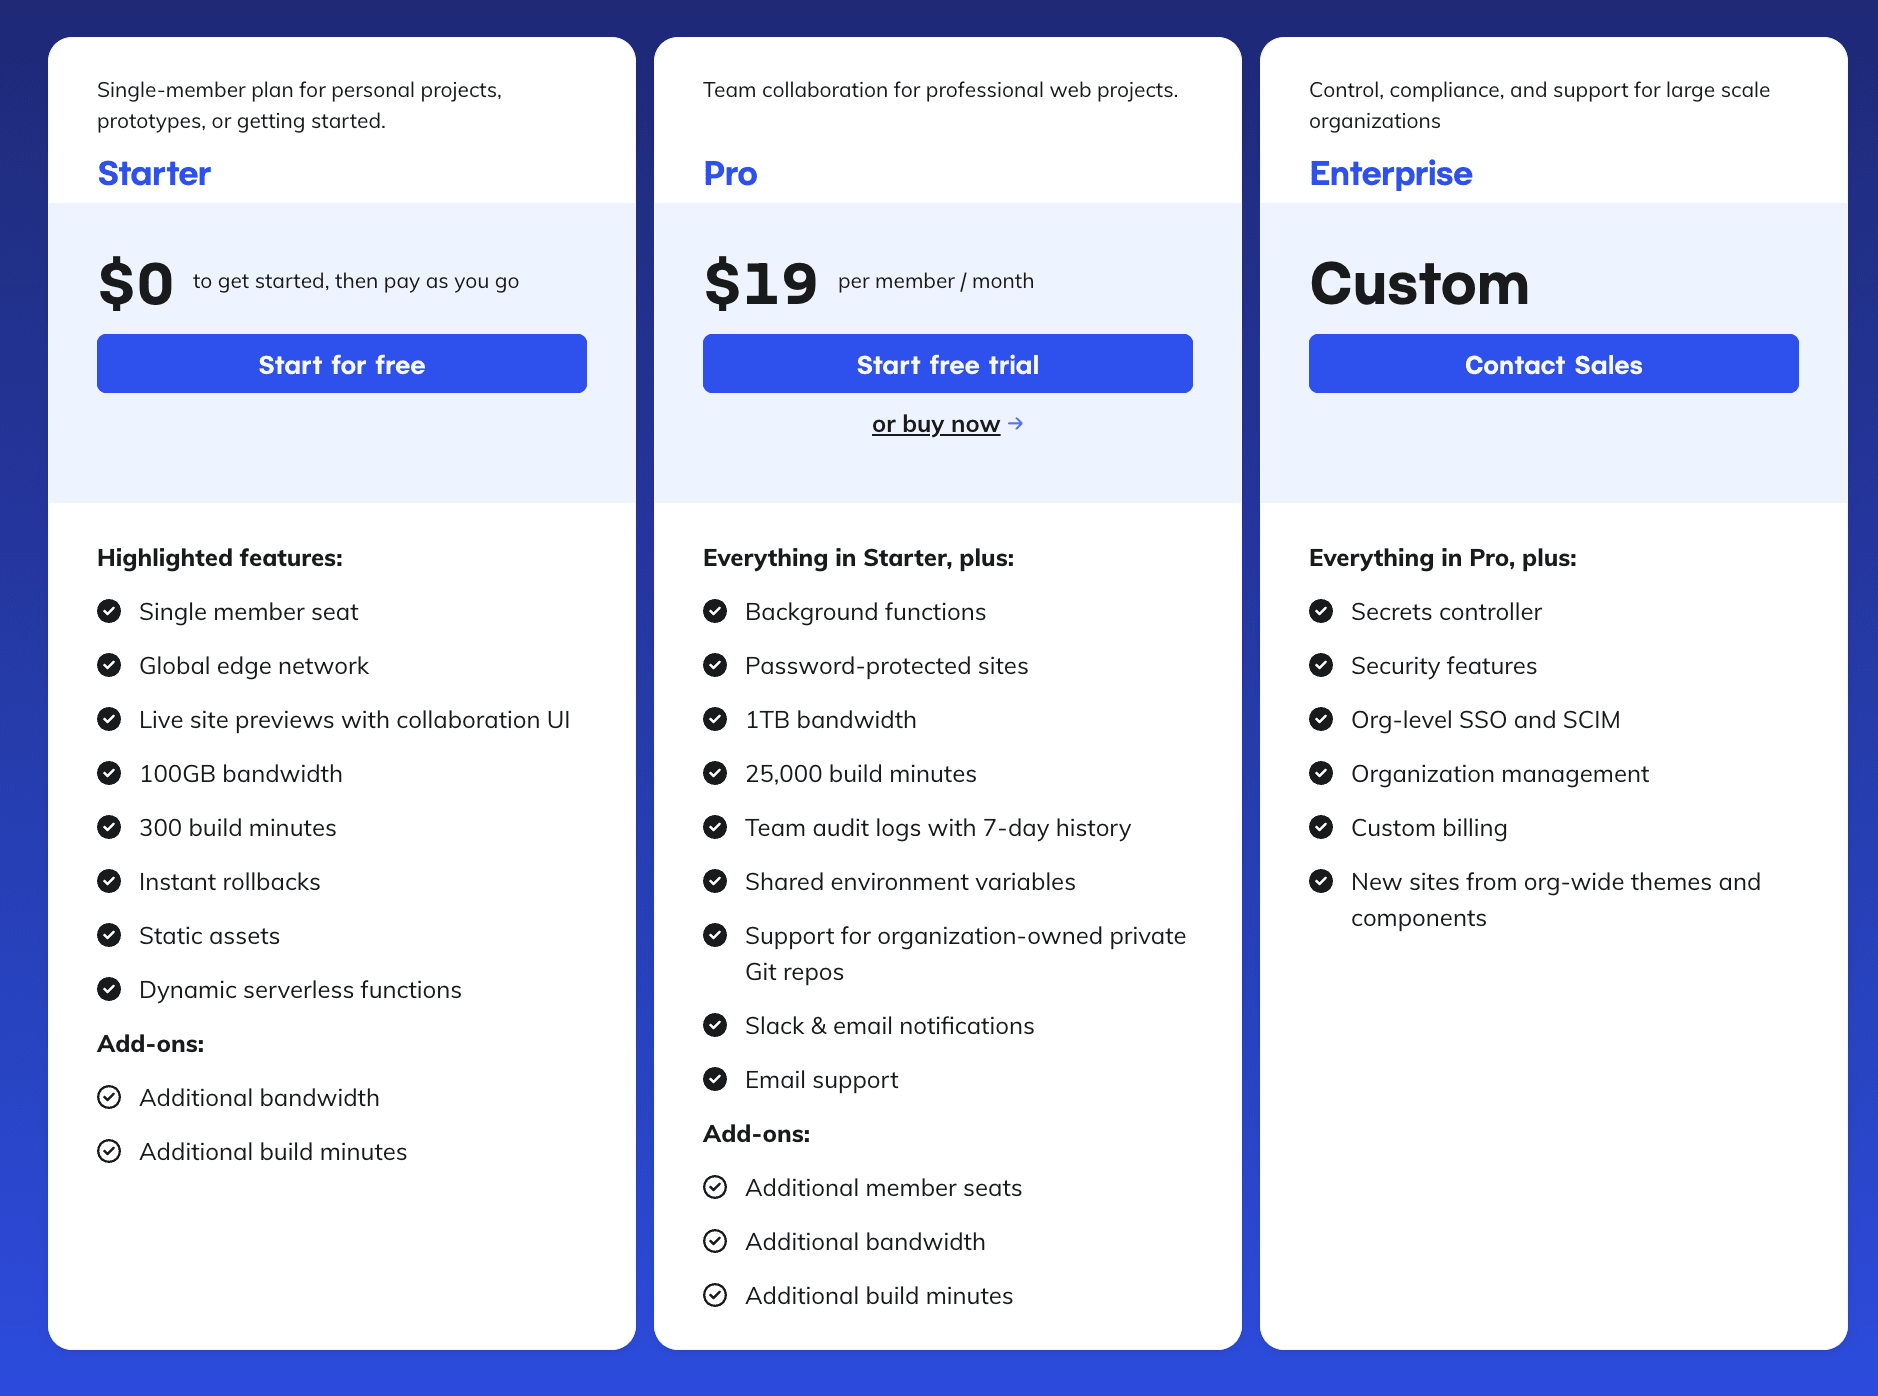
Netlity hosting cost Free tier available, with Pro plans starting at $19/month.
2.4. How to deploy Shopify hydrogen to Fly.io
Fly.io is a new, developer-focus public cloud, easy to deploy on, power to grow on. It offers powerful and scalable hosting solutions with a focus on global deployment and edge computing.
Here’s how to deploy Shopify Hydrogen to Fly.io:
Step 1: Install Fly CLI
- Install "flyctl" and sign up for Fly.io
Step 2: Set up the project
-
Navigate to your app directory:

-
Run the following command to create a new app in Fly.io and create a fly.toml file:
 Step 3: Configure Fly.io
 -
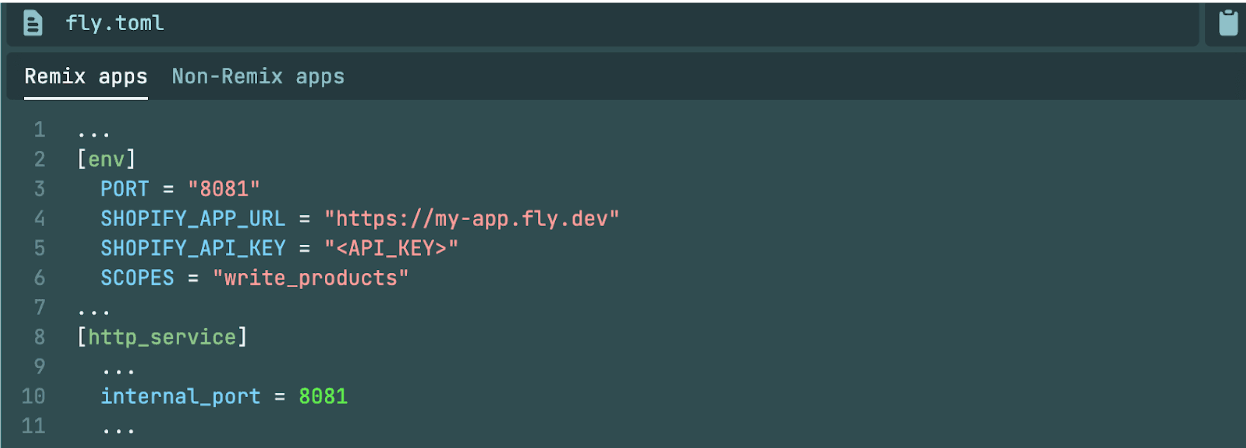
From your project root, open fly.toml.
-
In the [env] section, add the following environment variables, using the format
= " ": 
-
In the [http_service] section, change the value of internal_port. This value needs to match the PORT value.
 Step 4: Set environment secrets
 Step 5: Deploy to Fly.io
Fly.io hosting cost
Offers a pay-as-you-go model with costs depending on the resources used, typically starting at $5/month.
2.5. How to deploy to Cloudfare Workers
Cloudflare Workers are a platform for enabling serverless functions to run as close as possible to the end user. In essence, the serverless code itself is 'cached' on the network, and runs when it receives the right type of request. Cloudflare Workers code is hosted in Cloudflare's vast network of data centers around the world. Here’s how to deploy Shopify Hydrogen to Cloudfare Workers:
Step 1: Create a Hydrogen Project
Step 2: Create wrangler.toml
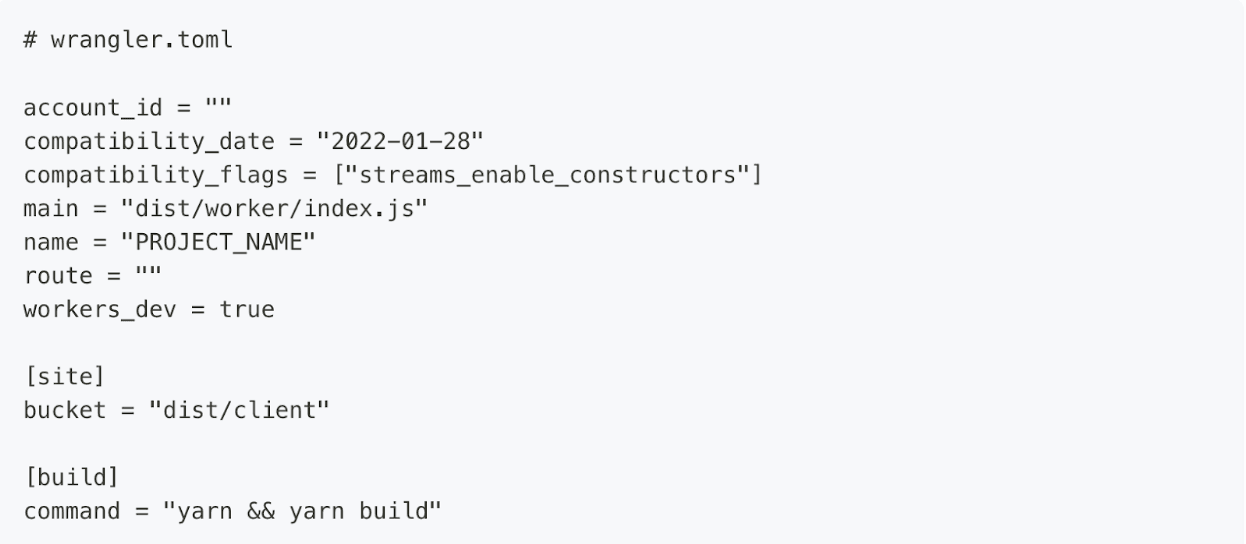
- Create wrangler.toml File.
- Replace account_id, name, and route with your Cloudflare account ID, project name, and route, respectively.
Step 3: Install Cloudflare KV asset handler

Step 4: Create a new Worker entry file
- Create worker.js
Step 5: Update package.json

Step 6: Deploy with Wrangler

Cloudflare hosting cost
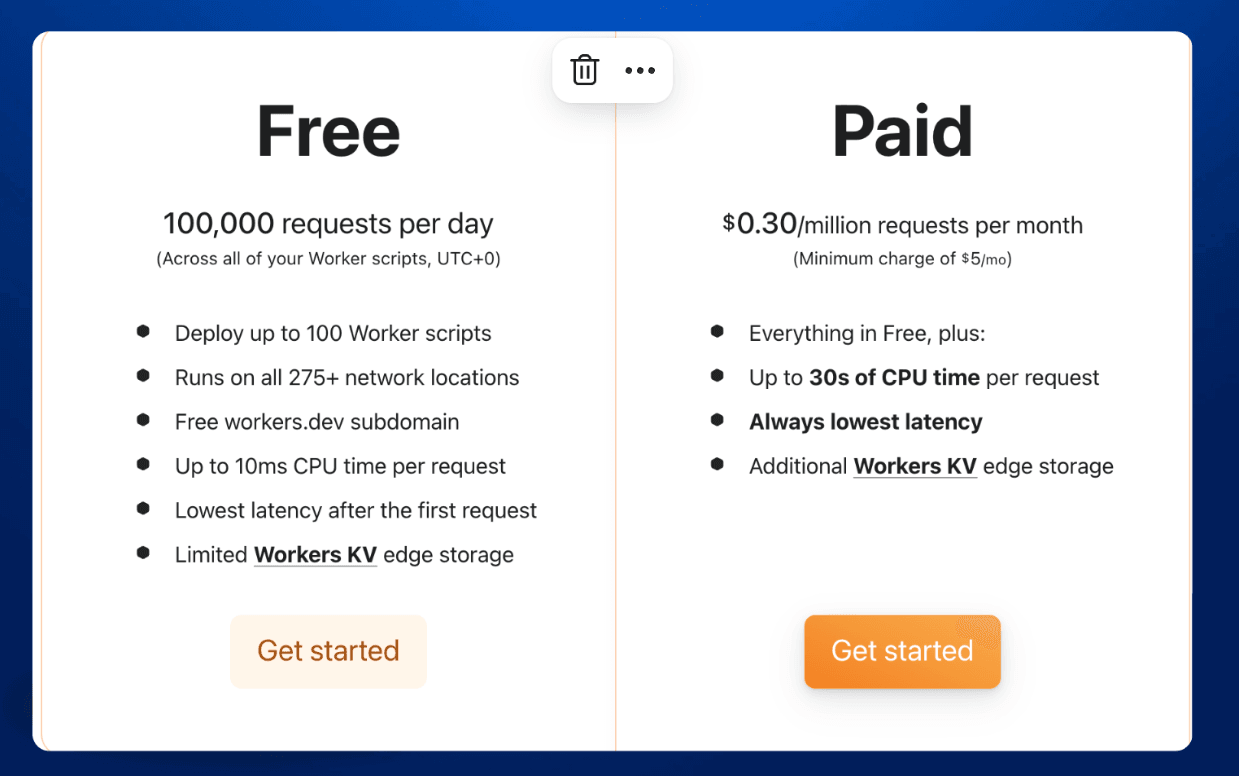
Workers AI is included in both the free and paid workers plans and is priced at $0.30/million requests per month.
2.6. How to deploy to AWS
AWS is one of the most robust hosting solutions for businesses that need enterprise-level performance and customization.
1. Set Up Your Hydrogen Project
Before deploying, ensure you have developed your Hydrogen storefront locally.
- Install Shopify CLI: Run the following command to install the Shopify CLI, which is essential for working with Hydrogen.

- Create a Hydrogen App:

- Install dependencies: Navigate to the project folder and install the necessary dependencies.

- Develop Your Storefront: Customize your storefront by modifying components, styles, and server-side code in Hydrogen.
2. Choose Your AWS Hosting Solution
There are two popular ways to host Hydrogen on AWS:
1. AWS Amplify (Simpler, good for small-to-medium-sized projects)
2. AWS Elastic Beanstalk (More customizable and scalable)
Let’s walk through both options:
Option 1: Deploy with AWS Amplify
AWS Amplify is an easy-to-use platform that simplifies front-end and full-stack web development on AWS.
Step 1: Set Up AWS Amplify
- Install Amplify CLI:

Follow the on-screen instructions to configure the CLI with your AWS account credentials.
- Initialize Amplify: Inside your Hydrogen project folder, run:

This will set up your Amplify project, prompting you to configure the environment settings, like region and app name.
Step 2: Deploy Your Hydrogen Storefront
- Build Your Hydrogen Project: Make sure your project is ready for production by building it.

- Deploy to AWS Amplify: Once the build is ready, deploy it to AWS by running:

This command deploys your Hydrogen storefront to Amplify’s hosting environment.
Step 3: Configure Environment Variables
Hydrogen may require environment variables for API keys or other sensitive information.
- Set up your environment variables in Amplify via the console: Go to AWS Amplify Console → Select your app → Click on "Environment Variables" → Add your variables here.
Step 4: Continuous Deployment
Set up continuous deployment by linking your GitHub repository to Amplify so that any changes made in your repo are automatically deployed.
- In the Amplify Console, go to "Connect repository" and link your GitHub account.
Option 2: Deploy with AWS Elastic Beanstalk
AWS Elastic Beanstalk gives you more control over the infrastructure and is ideal for large, highly customizable Hydrogen stores.
Step 1: Set Up Elastic Beanstalk Environment
- Install AWS Elastic Beanstalk CLI:

- Initialize Elastic Beanstalk: Inside your Hydrogen project, run the following command to configure Elastic Beanstalk:

During initialization, select:
-
AWS region where you want to deploy
-
Application name (create a new one)
-
Node.js as the platform (Hydrogen is a React-based app, so Node.js is the appropriate runtime)
Step 2: Create a New Environment
Create an environment to deploy your Hydrogen app. Use the following command:

Elastic Beanstalk will provision an environment for your app, including an EC2 instance, load balancer, and other resources.
Step 3: Update Environment Variables
You’ll need to set up environment variables (e.g., for Shopify Storefront API access).
- In the Elastic Beanstalk Console, navigate to your application → Configuration → "Software" → Add your environment variables here.
Step 4: Deploy the App
- Build Your Hydrogen App:

- Deploy to Elastic Beanstalk: Once the build is complete, deploy the app to your environment:

This command uploads your code to Elastic Beanstalk, which automatically handles deployment, scaling, and monitoring.
Step 5: Monitor and Scale
-
Use the Elastic Beanstalk Console to monitor your app’s health, performance, and scaling options.
-
Configure auto-scaling settings if needed to handle large traffic loads.
AWS hosting cost
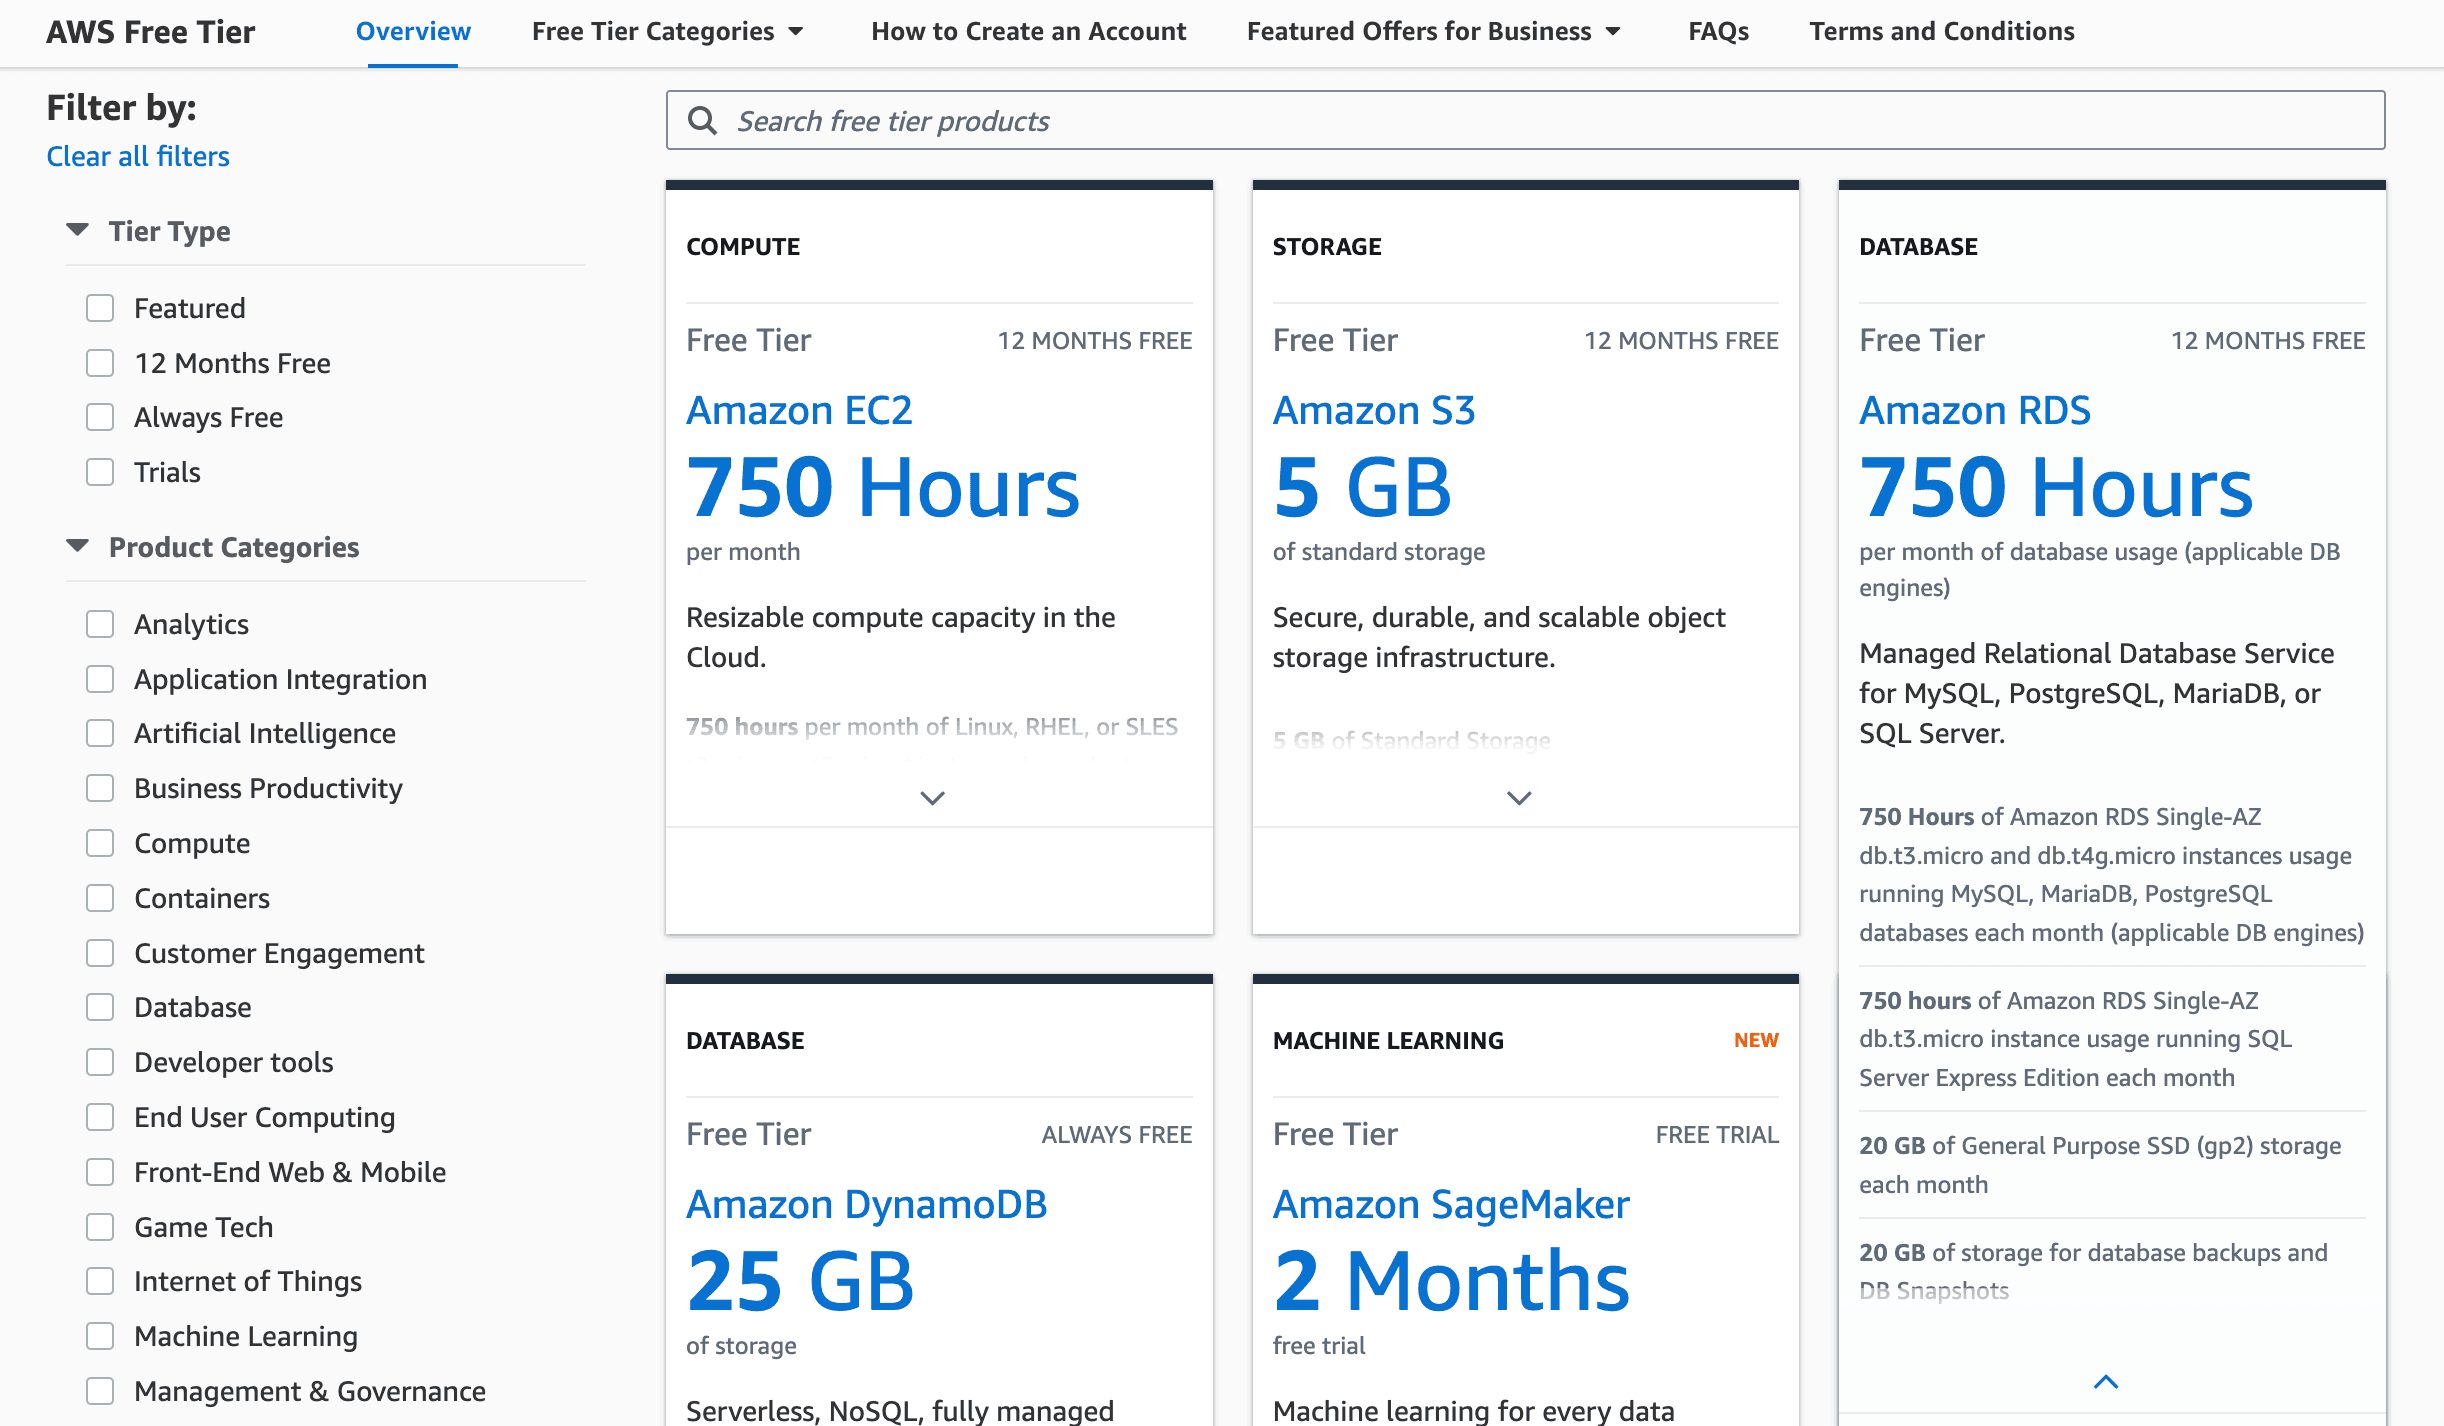
AWS offers a Free Tier that provides new users with access to a range of services, such as computing, storage, and machine learning, for up to 12 months. There are three types of offers: free trials (short-term), 12-months free (for new customers), and always free (no expiration). This allows users to explore and build on AWS without immediate costs, but usage beyond free limits incurs standard charges. To get started, users need to create a free account.
III. Aspects to consider which hosting is the best suit for your Shopify hydrogen?
Choosing the right hosting solution for your Shopify Hydrogen storefront is crucial to ensuring optimal performance and reliability. Whether you opt for Shopify's native Oxygen, Vercel, Netlify, Fly.io, or Cloudflare, each platform offers unique advantages to meet your specific needs. Evaluate the features and costs of each to determine the best fit for your e-commerce business. By deploying your Hydrogen storefront to one of these robust hosting solutions, you can provide a seamless and engaging shopping experience for your customers, ultimately driving growth and success for your online store.
Read more:
