
- Client: Tiger Webkit
- Location: Vietnam
- Platform: Shopify
- Services: App Development and Landing Page Development
About Tiger Webkit
Tiger Webkit, is a Indonesia-based company dedicated to providing innovative e-commerce solutions. They forcus on developing Shopify app and selling them as products, with the goal to support merchants to expand sales page functions on their Shopify stores.
"Our goal is to provide online brands with the cutting-edge software they need to power growth and deliver exceptional customer experiences."

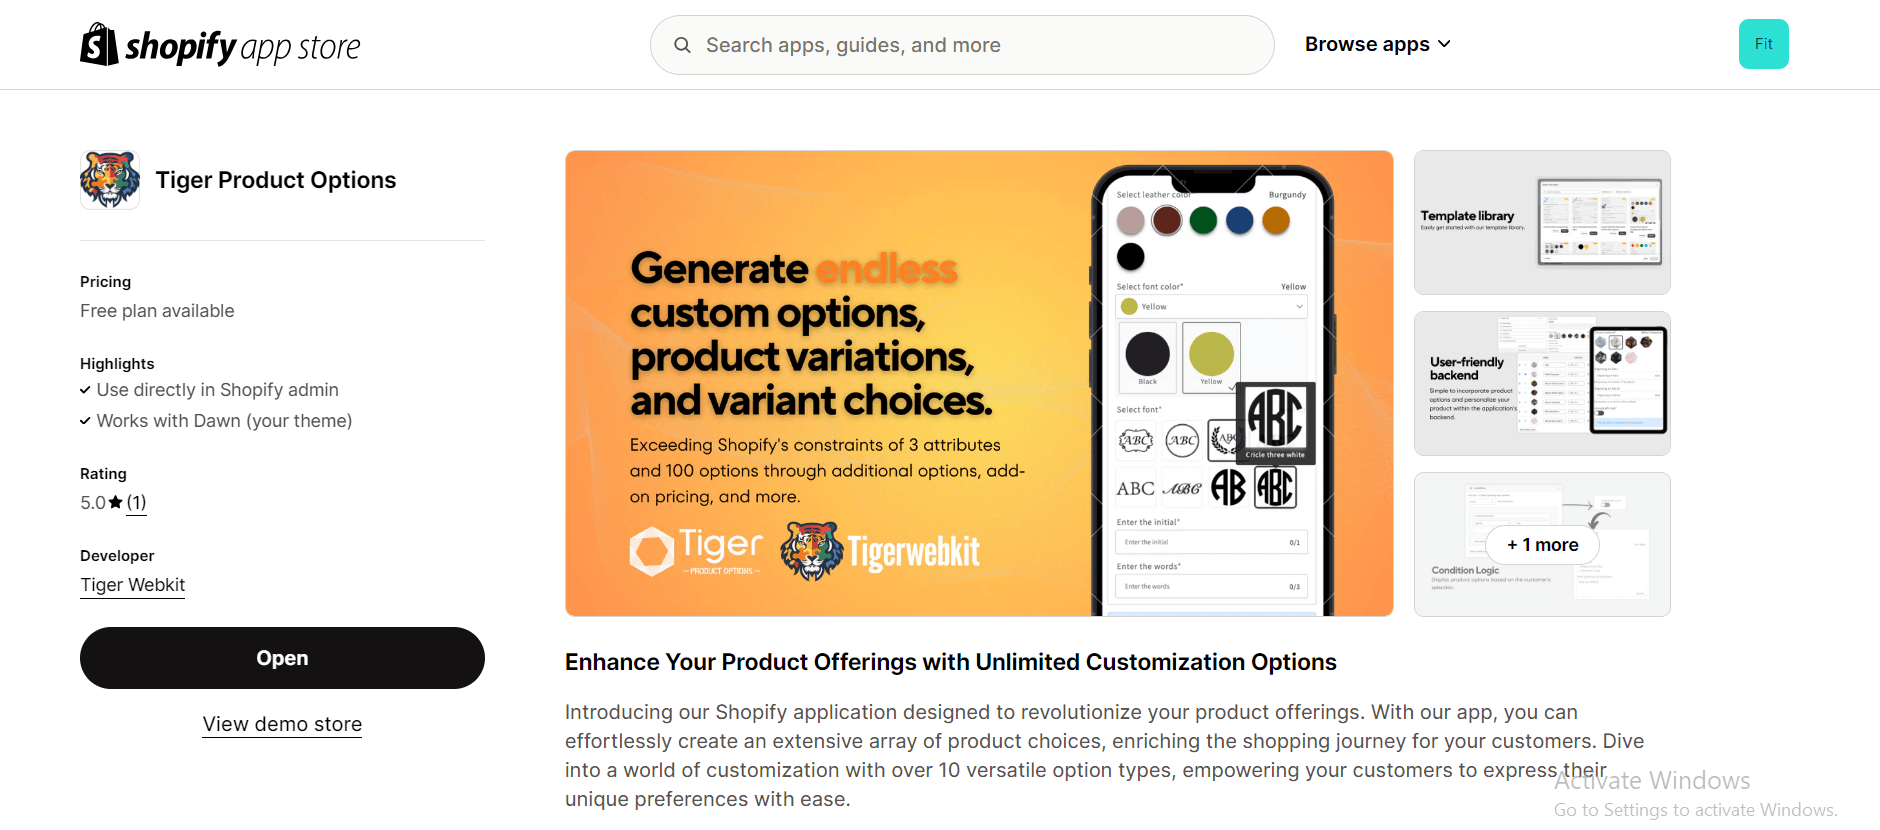
Tiger Webkit prouds to bring Tiger Product Options app to the table; which provides the best-in-class solution for Shopify online stores by addressing specific needs such as customizable product options, making it a valuable tool for online retailers looking to offer a personalized shopping experience.
 Accompanied with True Storefront, they have leveraged expertise to ensure the app delivers top-notch performance. This collaboration aimed to bring the best services to the table, helping the app become a reliable solution for e-commerce businesses seeking to enhance their customer offerings.
Tiger Webkit's challenges
One of the significant challenges with Shopify is its restriction on product attributes and options. Shopify only allows for three product attributes (size, color, material, etc.) and a maximum of 100 options per product. This limitation poses several issues for sellers, particularly those dealing with products that require extensive customization.
#1. Impact on customization
Sellers often need to offer a wide range of customizable options to meet customer demands. For example, a T-shirt store might want to offer variations in size, color, fabric type, and print design. With only three attributes and 100 options, it's challenging to accommodate such extensive customization.
The limited options can lead to a less personalized shopping experience. Customers may feel constrained by the available choices and may turn to competitors who offer more flexibility.
Managing inventory and orders becomes more complex when there are numerous product variations. Shopify's limitations force sellers to use workarounds, such as creating separate products for each variation, which complicates the management process and can lead to errors.
#2. Technical workarounds
To overcome these limitations, sellers often need to invest in additional apps or custom solutions. This increases the overall complexity and cost of managing their online store.
Custom solutions and integrations require regular maintenance and updates to ensure compatibility with Shopify’s updates, adding to the operational burden for sellers.
Why True Storefront?
After conducting thorough research, Tiger Webkit discovered True StoreFront’s services. Intrigued by the comprehensive approach to e-commerce solutions, Tiger Webkit reached out for a free consultation.
TrueStoreFront’s team showed dedication and professionalism with a commitment to deliver tailor-made solutions that aligned perfectly with Tiger Webkit's needs. Convinced, Tiger Webkit decided to partner with TrueStoreFront to develop their custom Shopify app and landing page.
The estimated cost for the project was provided, giving Tiger Webkit a clear budget overview. Additionally, TrueStoreFront committed to ongoing customer support and service, ensuring continuous assistance and updates throughout the project and beyond.
How True Storefront helped them out?
TrueStoreFront provided a complete solution, from the development of the Ultimate Custom Product Options app to the creation of a compelling landing page.
Our scope of work (SOP)
Our work included several key points:
-
Custom App Development: Built the Ultimate Custom Product Options app, allowing users to add multiple customization options to their products seamlessly.
-
Engaging Design: Crafted a visually appealing landing page that captures visitors' attention and communicates the app’s value.
-
SEO Integration: Ensured the landing page is optimized for search engines, driving organic traffic and improving visibility.
-
Responsive Design: Developed a mobile-friendly layout, ensuring a consistent user experience across all devices.
Key objectives
Seeking TrueStoreFront’s expertise, Tiger Webkit aims to develop a custom production options app, which they plan to sell on the Shopify App Store. The app will be designed to enhance product customization capabilities, addressing the limitations of Shopify's default options.
The app will include support for multiple option types, dynamic pricing, a library template for easy setup, robust file upload capabilities, and conditional logic for a tailored user experience.
The solution we brought to the table
The development of the Shopify App: Tiger Product Options was planned and executed over a period of six months with the dedicated team of three full-stack developers.
The process began with meetings with Tiger Webkit for detailed discussions to fully understand their needs and objectives. As always, we started by consulting the tech stack we would use, which this time included:
Tech stacks we used:
- Golang: Language for back-end services
- React JS: Java Script library for front end development
- Postgres DB: Data management
- Elasticsearch: Search engine
- Redis: Data access/ storage
Let's explore the step-by-step process that we've implemented for Tiger Webkit.
1. Design app databases We designed the app databases using Postgres DB, ensuring a robust and scalable architecture. This setup supports efficient data handling for custom options, product variations, and user-defined conditions.
2. Develop backend REST API Using Golang, the team developed the backend to handle business logic and data processing efficiently. Integration with Shopify's API was also completed during this phase to manage product options and synchronize data seamlessly.
3. Develop embedded app dashboard UI The app dashboard was built with React JS, creating an intuitive and user-friendly interface. It enables easy management of product options, with Elasticsearch for advanced search capabilities and Redis for data caching.
4. Develop frontend Shopify API integration We integrated the frontend with Shopify’s API to render product options dynamically. This integration ensures seamless interaction between the app and Shopify, allowing real-time updates and customizations for product variants.
Tiger Product Options app implementation
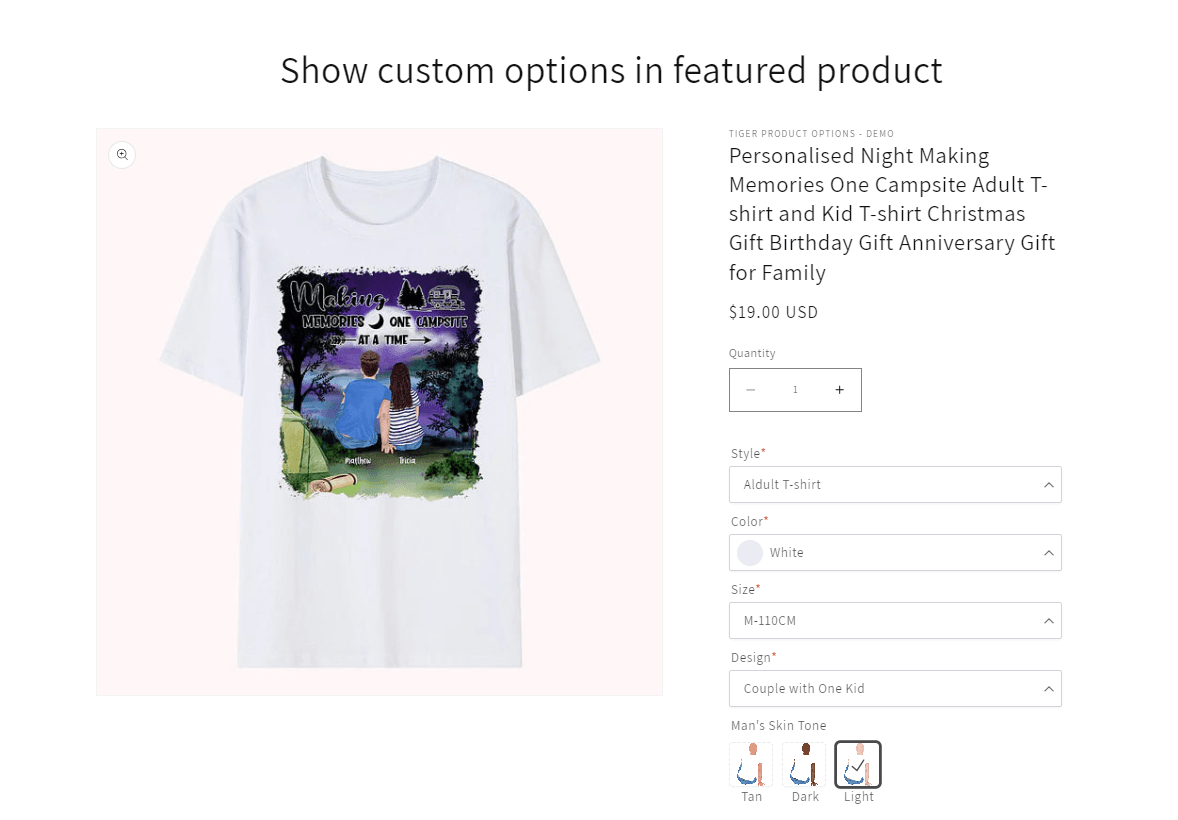
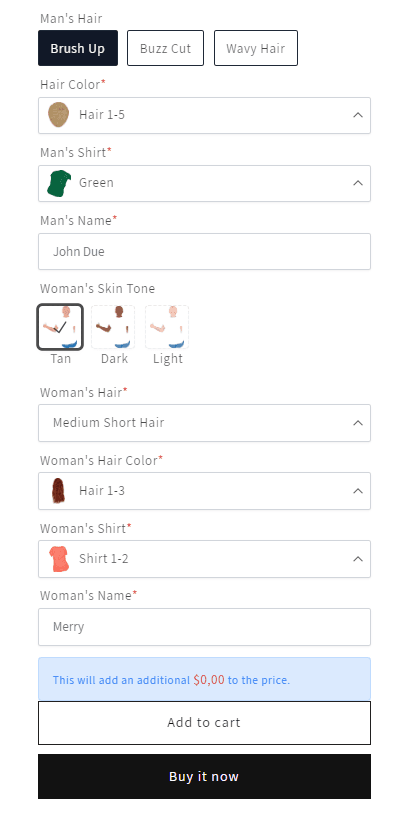
Tiger Product Options app is designed to significantly enhance product customization capabilities on Shopify. The app addresses the limitations of Shopify’s default options by offering a suite of powerful features to improve the customization and user experience for both sellers and customers.
App main features
-
Support for 10+ Option Types: Includes text fields, file uploads, color/image swatches, dropdowns, and more to offer extensive customization options.
-
Pricing Add-On for Product Options: Allows dynamic pricing adjustments based on the selected product options, providing flexibility in pricing strategies.
-
Library Template: Facilitates the import and export of option forms, simplifying the setup process and ensuring consistency across products.
-
Easy Application to Products: Allows sellers to quickly and easily apply custom option forms to any product in their inventory.
-
Enhanced File Upload Support: Provides robust file upload capabilities, essential for products requiring personalized inputs such as images or documents.
-
Condition Logic: Enhances the customization experience by applying conditions to option displays, ensuring that only relevant options are shown to customers based on their previous selections.
Overview tutorial
Click here to install this app from Shopify App Store.
Tiger Product Options is extremely user-friendly. Let's go through the step-by-step tutorial and explore how the app work.
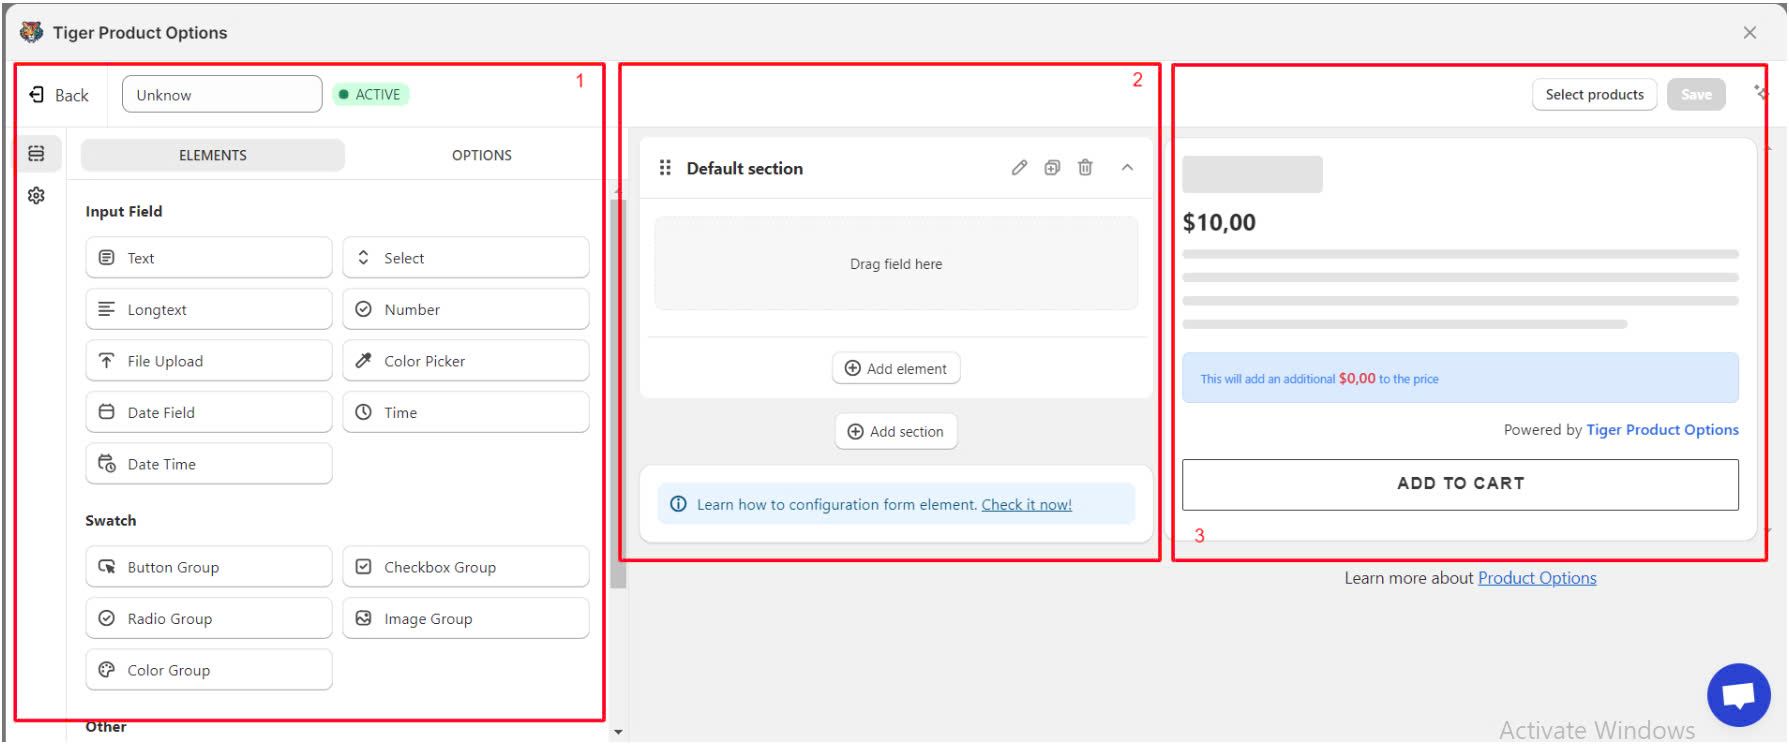
Step 1: Create new form
Initiate the creation of a product form option and seamlessly apply it to your products for a storefront display that stands out and offers enhanced customization:
-
Form Elements: List all elements that you can use to build your product options, including input field, swatch ,... There are a total of 19 elements for you to choose from.
-
Section: Where you add elements, each section includes one or multiple elements.
-
Preview: How the product will look like with the sections you build in step 2.
Create Sections:
- Click Add section to create a new section.
- Configure the section by adding a title, choosing whether to show the title on the front end, and deciding if the section should be open by default.
- In Advanced settings, you can add a custom class for specific styling and enable/disable the total price display.
Add Elements:
- Drag and drop elements from the Form Elements list into your section.
- Continue adding elements until your form is complete.
Configure Elements:
- Select the Element: Click on the element within the section to open its configuration settings.
- Adjust Settings: E.g. Input Fields: Customize the label, placeholder text, default value, and validation rules.
Customize Advanced Settings:
- Advanced Options: For more control, you can add custom classes for specific styling or enable features like showing the total price.
- Visibility: Choose whether to show or hide the element on the front end.
Save and Preview:
- Save Changes: Ensure you save your configurations.
- Preview: Use the preview section to see how the product will look with the configured options.
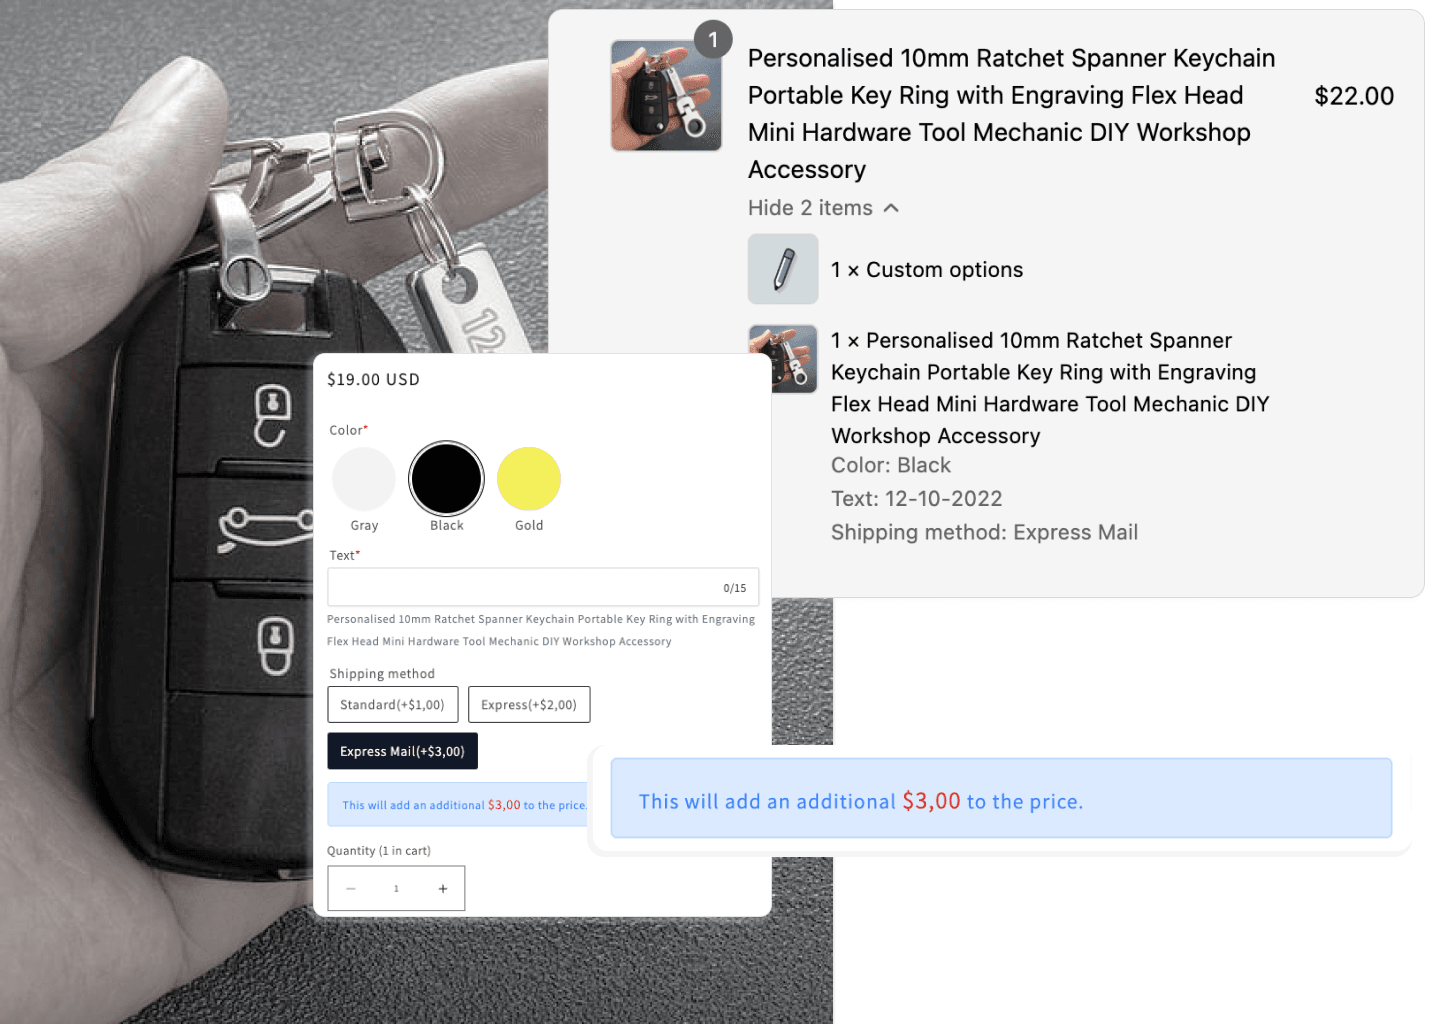
Step 2: Set up price add-ons
The price add-on feature in the Tiger Product Options app allows you to associate an option value with an existing variant and its price. This enables additional charges when the option value is selected, providing flexibility in pricing customizable products. Here’s a quick guide to setting up price add-ons:
- Add Options to the Option Set
- Select the element from the created section.
- Under Options, add a new option.
Enable Price and Set Additional Price:
- Enable the price setting
- Set the additional price for each option, either as a fixed price or a percentage
- Assign the Form to Products and Verify the updates
- Open the product you assigned the form to
Check that the add-on price is added to the total when a user selects an option.
Step 3: Configure conditional logic
Conditional logic allows you to show or hide specific elements and options based on user selections, providing a dynamic and customized shopping experience. Here’s how to set up conditional logic
1, Access the Condition Setting Panel:
- Navigate to Product Options and select the form you want to add conditional logic to.
- Open the Condition setting panel.
2, Create New Condition Logic: Click on Add condition group
3, Configure the Condition Logic:
-
Select Logic Type: Choose whether you want to Show or Hide an element or option.
-
Add Statements: Define the conditions that must be met. You can add multiple statements to a single condition.
-
Conjunctional Conditions: Create flexible logic by adding multiple conjunctional conditions (e.g., AND, OR) to control when elements should be shown or hidden.
Step 4: Assign products to forms
Once you have set up a form in the Tiger Product Options app, you can assign it to specific products, all products, or products that meet specific conditions. Here’s how to do it:
1, Open the Form:
- Open the Tiger Product Options app.
- Navigate to Product Options and select the form you want to assign to products.
- On the top right, click Select products.
2, Assign the Form to Products:
There are three ways to assign the form to products:
- Manually: Manually enable this option set for certain products.
- Automate: Existing and future products that match specified conditions will automatically have this option applied.
- All Products: Apply this option set to all products in your store, except for those that have been assigned manually or automatically.
Step 5: Import and Export Forms
The import and export functions in the Tiger Product Options app help you move forms between stores easily and serve as a backup option for your forms. Here’s a quick guide on how to use these features:
1, Exporting Forms:
- Access Product Options: Navigate to Product Options
- Select Forms to Export
- Select one or multiple forms you wish to export.
- Export Forms
- Click Export forms. The forms will be exported and saved to your computer. Ensure you save the file in a secure location.
2, Importing Forms:
- Access Product Options
- Navigate to Product Options. Import Forms
- Click Import Form Option.
- Select Forms to Import
- Choose the forms that you previously exported and upload the file. Complete Import Once the form file is uploaded, select Import to complete the process.
3, Configure and Assign: After importing, you can configure the forms, assign elements, and display them on the desired products.
The out-standing landing page for Tiger Webkit
TrueStoreFront developed the landing page for Tiger Webkit, showcasing their flagship product, Tiger Product Options Shopify app. This landing page is designed to drive engagement and conversions by highlighting the app's features and benefits, encouraging visitors to take action.
Visually, the landing page boasts a modern, attractive design that captures visitors' attention and enhances their overall experience. With clean lines, appealing colors, and high-quality imagery, it effectively highlights Tiger Webkit’s brand and the Ultimate Custom Product Options app.
The layout is intuitively organized, allowing visitors to easily find and access essential information. Clear menus and well-placed links ensure a seamless browsing experience, guiding users effortlessly to key sections such as app details, documentation, and contact information.
Main Menu Structure:
- Home: An inviting introduction to Tiger Webkit’s services and the Ultimate Tiger Product Options app.
- Shopify Apps: Detailed information on the app,including features and benefits.
- Contact: Easy access for inquiries and support.
- About Us: Insight into the company's mission and values.
- Blog: Updates and insights on the latest in digital marketing.
- Documentation: In-depth tutorials on using Tiger Product Options, ensuring users can maximize the app's potential post-installation.
Tiger Webkit's landing page reflects their commitment to providing top-notch e-commerce solutions and exceptional customer support, showcasing the Tiger Product Options app as a must-have tool for Shopify store owners.
Wrapping up
The collaboration between TrueStoreFront and TigerWebkit has successfully transformed Tiger Webkit's vision into a market-ready solution. By developing the Ultimate Custom Product Options app and crafting an engaging landing page, we’ve provided Tiger Webkit with a robust tool to enhance product customization and a compelling platform to attract and convert potential customers.
If you are looking to develop similar cutting-edge e-commerce solution, contact True StoreFront to discover how we can help bring your ideas to life with our tailored development services.
Inspired by Tiger Webkit’s success? Now it’s your turn!