In today's e-commerce world, efficient online store management demands more than great products; it requires seamless operations and accurate financial accounting. Shopify excels at sales and customer management, while QuickBooks is the industry standard for bookkeeping and financial analysis.However, operating these powerful systems separately leads to manual data entry, errors, and wasted time on tasks like reconciling sales, refunds, and inventory. This inefficiency diverts focus from growth and customer engagement.
Integrating Shopify and QuickBooks is a strategic move that automates financial management. It ensures accurate sales reconciliation, synchronized inventory, and streamlined expense tracking, leading to greater accuracy, significant time savings, and deeper business insights.
This guide will cover everything about integrating Shopify with QuickBooks: its benefits, methods, step-by-step instructions for popular solutions, and best practices. For any Shopify merchant, this integration is essential for a robust financial future.
I. Why Integrate Shopify with QuickBooks? The Unmatched Benefits
The decision to integrate Shopify with QuickBooks extends far beyond mere convenience. It's a strategic move that fundamentally enhances the efficiency, accuracy, and scalability of your e-commerce business. Let's delve into the key benefits that make this integration an indispensable tool for modern online retailers.
1. Automated Data Synchronization: Eliminate Manual Entry and Errors

At the heart of any successful integration lies automation. Without integration, every sale, refund, expense, and inventory adjustment made in Shopify would require manual entry into QuickBooks. This process is not only incredibly time-consuming but also highly susceptible to human error. A misplaced decimal, a forgotten transaction, or an incorrect category can ripple through your financial records, leading to inaccuracies that are difficult and costly to rectify.
With Shopify QuickBooks integration, these manual tasks become a thing of the past. Sales data, customer information, tax details, shipping fees, discounts, and even payment processing fees are automatically synced between the platforms. This means:
- Real-time Updates: Your financial records in QuickBooks are always up-to-date, reflecting the latest transactions from your Shopify store.
- Reduced Errors: Automation drastically minimizes the chance of data entry mistakes, ensuring the integrity and reliability of your financial statements.
- Time Savings: Imagine the hours you'll reclaim by eliminating manual reconciliation. This time can be redirected towards strategic planning, marketing, and customer service.
2. Accurate Financial Reporting: Gain Clear Business Insights
Reliable financial data is the bedrock of informed business decisions. When your Shopify and QuickBooks accounts are disconnected, getting a holistic and accurate view of your financial performance can be a significant challenge. You might have sales data in one place and expense data in another, making it difficult to reconcile and analyze.
Integration ensures that all your e-commerce financial data flows directly into QuickBooks, enabling you to generate precise and comprehensive financial reports, including:
- Profit and Loss Statements: Understand your revenue, cost of goods sold, and operating expenses to accurately gauge your profitability.
- Balance Sheets: Get a snapshot of your assets, liabilities, and equity at any given time.
- Cash Flow Statements: Monitor the movement of money in and out of your business, crucial for liquidity management.
- Sales Reports: Analyze sales trends by product, customer, or period, identifying top-performing items and areas for improvement.
With accurate reporting, you can confidently assess your business's health, identify trends, forecast future performance, and make data-driven decisions that propel your growth.
3. Streamlined Inventory Management: Avoid Stockouts and Overstocking
For any e-commerce business, inventory is a critical asset. Mismanaging inventory can lead to significant financial losses due to stockouts (lost sales) or overstocking (carrying costs, obsolescence). Without integration, keeping inventory levels consistent between Shopify and QuickBooks is a manual nightmare.
Shopify QuickBooks integration allows for seamless synchronization of inventory data. When a product is sold on Shopify, the corresponding inventory count is automatically updated in QuickBooks, and vice versa. This offers several advantages:
- Real-time Inventory Counts: Always know exactly how much stock you have available across all channels.
- Cost of Goods Sold (COGS) Automation: As products are sold, their cost of goods sold is automatically recorded in QuickBooks, providing accurate profit margins.
- Improved Purchasing Decisions: With accurate inventory data, you can make smarter decisions about when and how much to reorder, optimizing your cash flow and storage costs.
- Prevention of Overselling: Avoid the embarrassment and customer dissatisfaction of selling items that are actually out of stock.
4. Simplified Tax Preparation: Stay Compliant and Stress-Free
 Tax season is often a source of dread for business owners. The complexity of sales tax, income tax, and various deductions can be overwhelming, especially when dealing with disparate financial records.
Integrating Shopify with QuickBooks significantly simplifies tax preparation by:
- Automated Sales Tax Calculation and Tracking: Shopify accurately calculates sales tax based on customer location and product type. This information is then seamlessly transferred to QuickBooks, making it easy to generate sales tax reports and file returns.
- Categorized Expenses: All your business expenses (shipping, advertising, supplier costs, etc.) can be properly categorized in QuickBooks, making it straightforward to identify deductible expenses.
- Organized Financial Records: With all your financial data in one place and accurately categorized, preparing for audits or filing your annual taxes becomes a much smoother, less stressful process.
5. Enhanced Customer Management: A Holistic View of Your Clients
While Shopify is excellent for managing customer orders and basic profiles, QuickBooks allows for a more detailed financial history with each client. Integrating the two platforms provides a comprehensive view of your customers, linking their purchase history from Shopify with their payment records and any outstanding invoices in QuickBooks. This can be beneficial for:
- Customer Relationship Management (CRM): Better understanding customer purchasing patterns and financial interactions.
- Targeted Marketing: Using purchase history data to inform future marketing campaigns.
- Improved Customer Service: Quickly accessing a customer's full transaction history to resolve queries efficiently.
6. Scalability and Growth: Future-Proof Your Business
As your e-commerce business grows, the volume of transactions will inevitably increase. Manual accounting processes that might be manageable for a handful of orders quickly become unsustainable for hundreds or thousands.
Shopify QuickBooks integration provides the scalability needed to handle increased transaction volumes without a proportional increase in manual workload. By automating core financial processes, you free up resources that can be reallocated to growth initiatives such as expanding your product line, exploring new markets, or investing in marketing. This integration acts as a foundational element, ensuring your financial infrastructure can support and facilitate your business's expansion rather than hindering it.
In summary, integrating Shopify with QuickBooks isn't just about saving time; it's about building a more robust, accurate, and scalable financial framework for your e-commerce business. It empowers you to make smarter decisions, reduce operational friction, and ultimately drive sustainable growth.
II. Understanding Integration Methods: Choosing the Right Solution
Before diving into the "how-to," it's crucial to understand the various methods available for integrating Shopify with QuickBooks. The best solution for your business will depend on factors such as your budget, technical expertise, the volume of your transactions, and the specific level of customization and automation you require.
Generally, there are three primary approaches to integrating Shopify with QuickBooks:
1. Manual Data Entry (Not Recommended for Long-Term)

While technically a form of "integration" in that data moves from one system to another, this method involves manually extracting information from Shopify and inputting it into QuickBooks. This might involve:
- Downloading sales reports from Shopify and manually entering summary data or individual transactions into QuickBooks.
- Manually tracking inventory changes and updating QuickBooks.
- Reconciling bank statements with Shopify sales and QuickBooks entries.
Pros:
- No upfront cost for integration tools.
- Full control over how data is entered (though this is also a con due to error potential).
Cons:
- Extremely time-consuming: The biggest drawback, especially for businesses with even moderate transaction volumes.
- High risk of errors: Human error is almost inevitable with repetitive manual data entry.
- Lack of real-time data: Financial reports are only as current as your last manual update.
- Not scalable: Becomes unmanageable as your business grows.
- Inefficient: Diverts valuable time from core business activities.
Recommendation: Only suitable for businesses with extremely low transaction volumes (e.g., a few sales per week) and a very tight budget. As soon as your business sees consistent sales, you should absolutely transition to an automated solution.
2. Native Integrations / Direct Apps from Shopify App Store
Shopify's extensive App Store offers numerous applications specifically designed to connect with QuickBooks. These apps are typically developed by third-party providers and offer varying levels of functionality and pricing. They are often built as connectors that pull data from Shopify's API and push it into QuickBooks' API.
How they work: You install the app from the Shopify App Store, connect it to your QuickBooks account (either QuickBooks Online or QuickBooks Desktop, depending on the app), and then configure its settings. These settings usually involve mapping accounts, defining how transactions are grouped (e.g., summary daily entries vs. individual transactions), and setting up rules for taxes and refunds.
Pros:
- Relatively easy setup: Often designed with user-friendly interfaces.
- Automated data sync: Eliminates manual entry.
- Variety of features: Different apps offer different levels of detail, customization, and pricing.
- Support: Most reputable apps come with customer support.
- Cost-effective: Generally more affordable than custom solutions.
Cons:
- Varying quality: Some apps are better than others. Research and reviews are crucial.
- Subscription costs: Most apps operate on a monthly subscription model.
- Limited customization: While configurable, they might not perfectly match highly unique business processes.
- QuickBooks Version Compatibility: Some apps only work with QuickBooks Online, others with Desktop, and some with both.
Popular Examples:
- QuickBooks Sync by Intuit (for QuickBooks Online): Often considered the most direct and reliable option for QuickBooks Online users, as it's developed by Intuit itself.
- Connect to QuickBooks Online (by Intuit): A robust option specifically for QBO.
- Zapier: While not a dedicated Shopify-QuickBooks app, Zapier is an automation tool that can connect thousands of apps, including Shopify and QuickBooks. It uses "Zaps" (automated workflows) to move data.
- Third-party apps like A2X, Synder, Bold Custom Orders: These often offer more advanced features for complex accounting scenarios.
Recommendation: This is the most popular and generally recommended approach for the vast majority of small to medium-sized Shopify businesses using QuickBooks. Start here before considering more complex solutions.
3. Custom Integrations / API Development
For businesses with very specific, complex, or high-volume needs that cannot be met by off-the-shelf apps, a custom integration might be necessary. This involves hiring developers to build a bespoke solution that directly connects Shopify's API with QuickBooks' API.
How they work: Developers write custom code to pull specific data fields from Shopify (orders, customers, products, inventory) and push them into specific fields or accounts within QuickBooks, following your exact business logic. This allows for highly tailored workflows, advanced data mapping, and unique automation rules.
Pros:
- Maximum flexibility and customization: Tailored precisely to your unique business processes.
- Full control: You own the code and the integration logic.
- Scalability: Can be built to handle extremely high transaction volumes.
Cons:
- High cost: Significant upfront development costs.
- Time-consuming to develop: Requires planning, coding, testing, and deployment.
- Technical expertise required: You'll need an in-house development team or a reliable external agency.
- Maintenance: Requires ongoing maintenance, updates, and troubleshooting if APIs change.
- Risk: Higher risk of bugs if not developed by experienced professionals.
Recommendation: Only consider this option if your business has very unique, high-volume, or complex accounting requirements that cannot be satisfied by existing apps, and you have the budget and technical resources to support it. For most businesses, a robust third-party app will suffice.
III. Choosing the Right Method: A Decision Framework

When deciding which integration method to use, consider these questions:
- What is your budget? (Free/Manual, Monthly Subscription for Apps, High Upfront for Custom)
- What is your transaction volume? (Low, Medium, High)
- What is your technical comfort level? (Plug-and-play, Configurable, Development Expertise)
- How complex are your accounting needs? (Basic sales and expenses, detailed inventory costing, multi-currency, specific tax rules)
- Which version of QuickBooks are you using? (QuickBooks Online, QuickBooks Desktop, Enterprise)
- How much control and customization do you need?
For the purpose of this guide, we will focus primarily on native app integrations, as they offer the best balance of automation, functionality, and ease of use for the majority of Shopify merchants.
IV. Step-by-Step Guide: Integrating Shopify with QuickBooks Online Using a Popular App
This section will provide a general, step-by-step guide for integrating Shopify with QuickBooks Online using a popular third-party app. While the exact steps might vary slightly between apps, the core process and considerations remain consistent. For this example, we'll imagine using a hypothetical "Shopify QuickBooks Sync Pro" app, but the principles apply to options like QuickBooks Sync by Intuit, A2X, or Synder.
Before you begin, ensure you have:
- An active Shopify store.
- An active QuickBooks Online account (Plus or Advanced plans are often recommended for full feature compatibility).
- Admin access to both your Shopify store and QuickBooks Online account.
- A clear understanding of your current accounting setup and chart of accounts in QuickBooks.
Phase 1: Preparation and Planning
-
Clean Up Your QuickBooks Chart of Accounts:
- Review your existing Chart of Accounts in QuickBooks.
- Identify or create specific income accounts for your Shopify sales (e.g., "Shopify Sales Revenue").
- Create accounts for specific Shopify-related expenses (e.g., "Shopify Processing Fees," "Shopify App Fees," "Shipping Revenue," "Discounts Given").
- Ensure you have relevant asset accounts for inventory (e.g., "Inventory Asset").
- Make sure your sales tax liabilities are correctly set up.
- Why this is important: Proper account mapping is crucial for accurate financial reporting. If you don't have dedicated accounts, all your Shopify transactions might get lumped into generic accounts, making analysis difficult.
-
Understand Your Shopify Data:
- Familiarize yourself with the types of transactions Shopify generates: Sales (orders), Refunds, Discounts, Shipping charges, Sales tax collected, Payment gateway fees.
- Decide how you want these transactions to appear in QuickBooks (e.g., as individual sales receipts, daily summary entries, or journal entries). Many apps offer options here.
-
Back Up Your Data:
- While unlikely to cause issues, it's always good practice to back up your QuickBooks Online data before initiating a new integration.
- You can export various reports from QuickBooks as a safeguard.
Phase 2: Choosing and Installing the Integration App

-
Research and Select an App:
- Go to the Shopify App Store and search for "QuickBooks."
- Read reviews, check ratings, and compare features and pricing plans.
- Look for apps specifically designed for your QuickBooks version (Online vs. Desktop).
- Consider free trials to test functionality before committing. Popular choices for QBO include "Connect to QuickBooks Online" (by Intuit), A2X, and Synder.
- Pro Tip: For QuickBooks Online, the official "Connect to QuickBooks Online" app by Intuit is often a good starting point due to its direct integration with Intuit's ecosystem.
-
Install the App from the Shopify App Store:
- Once you've chosen an app, click "Add app" on its Shopify App Store listing.
- Review the permissions requested by the app (e.g., access to orders, products, customers).
- Click "Install app" to proceed. You will be redirected to the app's setup page.
Phase 3: Connecting and Configuring the App
-
Connect to QuickBooks Online:
- The first step in the app's setup wizard will typically be to connect to your QuickBooks Online account.
- Click the "Connect to QuickBooks" or "Authorize" button.
- You will be redirected to an Intuit login page. Enter your QuickBooks Online credentials.
- Authorize the app to access your QuickBooks Online data.
- Once authorized, you'll be redirected back to the app's setup within Shopify.
-
Initial Setup and Account Mapping:
- This is the most critical part of the setup. The app will guide you through mapping your Shopify financial data to the corresponding accounts in QuickBooks.
- Sales Revenue Account: Map your general Shopify sales to an income account (e.g., "Shopify Sales Revenue").
- Payment Method Accounts: Map each payment method (Shopify Payments, PayPal, Stripe, etc.) to a relevant bank or clearing account in QuickBooks (e.g., "Shopify Bank Deposit Clearing Account"). This is crucial for bank reconciliation.
- Sales Tax Payable Account: Map sales tax collected in Shopify to your "Sales Tax Payable" liability account in QuickBooks.
- Shipping Revenue Account: Map shipping charges collected to a "Shipping Revenue" income account.
- Discount Account: Map discounts applied to a "Discounts Given" expense or contra-revenue account.
- Refund Account: Map refunds to a specific account or ensure they correctly reduce your sales income.
- Shopify Fees: Map Shopify's transaction fees and app fees to appropriate expense accounts (e.g., "Payment Processing Fees," "Shopify Subscription Fees").
- Cost of Goods Sold (COGS) & Inventory Asset (if applicable): If the app supports inventory synchronization, you'll map your inventory asset account and your COGS account. This is a more advanced feature and some basic apps might not handle COGS directly.
-
Choose Sync Preferences:
- Sync Frequency: Decide how often transactions should sync (e.g., daily, hourly, real-time). Daily or hourly is often sufficient.
- Start Sync Date: Specify from when you want to start syncing past Shopify orders. Be cautious with syncing very old data if your QuickBooks is already established. Often, starting from the current date or the beginning of your current fiscal period is best.
- Transaction Grouping:
- Individual Sales Receipts/Invoices: Each Shopify order creates a separate sales receipt or invoice in QuickBooks. This provides the most detail but can clutter QuickBooks for high-volume stores.
- Daily Summary Entry: All sales for a day are grouped into a single summary entry (often a journal entry or a single sales receipt with multiple line items). This keeps QuickBooks cleaner but provides less individual transaction detail.
- Recommendation: For most e-commerce businesses, a daily summary or weekly summary is preferable to prevent QuickBooks from becoming overloaded with individual sales transactions.
-
Set Up Sales Tax:
- Configure how sales tax collected in Shopify is mapped to your QuickBooks sales tax items and agencies. Ensure consistency between both platforms.
-
Configure Product/Item Sync (if applicable):
- Decide if you want products to be created in QuickBooks automatically when they are created in Shopify, or if you will manage products separately.
- If syncing inventory, ensure product SKUs match between Shopify and QuickBooks for accurate tracking.
Phase 4: Initial Sync and Testing
-
Perform an Initial Sync:
- After configuring all settings, initiate the first synchronization. Many apps allow you to sync a small batch of historical orders first to test the mapping.
- Monitor the sync process for any errors or warnings.
-
Review Transactions in QuickBooks:
- Go into your QuickBooks Online account.
- Check the newly synced transactions (Sales Receipts, Journal Entries, Bank Deposits).
- Verify that:
- Sales revenue is hitting the correct income accounts.
- Sales tax is hitting the correct liability accounts.
- Payment gateway fees are hitting the correct expense accounts.
- Bank deposit amounts match what you expect from your Shopify payouts.
- Inventory adjustments are correct (if syncing inventory).
-
Reconcile a Recent Shopify Payout:
- Compare a recent payout from Shopify (the amount that landed in your bank account) with the corresponding entries the integration created in QuickBooks.
- If the integration is set up correctly, the total sales, less fees, less refunds, should perfectly match the net deposit amount in your bank. This is a crucial reconciliation point. Many apps create a "clearing account" to manage this.
Phase 5: Ongoing Monitoring and Maintenance

-
Regularly Monitor Sync Status:
- Periodically check your integration app's dashboard for any sync errors. Address them promptly.
- Ensure data is flowing consistently and as expected.
-
Reconcile Bank Accounts:
- Continue to reconcile your bank accounts in QuickBooks regularly. This is your ultimate check to ensure all Shopify payouts and related transactions are correctly recorded.
-
Review Financial Reports:
- Regularly pull your Profit & Loss and Balance Sheet reports in QuickBooks to ensure they reflect your Shopify sales accurately.
- Check for any unusual entries or discrepancies.
-
Update Settings as Needed:
- If you change your chart of accounts in QuickBooks, add new payment methods to Shopify, or modify product categories, you may need to update your integration app's mapping settings.
- Stay informed about any updates to the integration app or changes to Shopify/QuickBooks APIs.
By following these steps, you can successfully integrate your Shopify store with QuickBooks Online, automating your accounting processes and gaining invaluable financial clarity. Remember, patience and thorough testing during the initial setup will save you significant headaches down the line.
V. Advanced Considerations and Best Practices for Shopify QuickBooks Integration
While the basic integration covers the essentials, optimizing your Shopify QuickBooks connection involves several advanced considerations and best practices. Implementing these can further refine your financial workflows and maximize the benefits of automation.
1. Handling Payment Gateway Fees and Payouts
One of the most common areas of confusion with e-commerce accounting is reconciling payment gateway fees and understanding net payouts.
- Payment Gateway Fees: Shopify Payments, PayPal, Stripe, etc., all charge fees per transaction. Your integration should ideally:
- Record the gross sales amount as revenue.
- Record the payment gateway fee as an expense.
- Record the net deposit amount into a "clearing account" or directly into your bank account.
- Clearing Accounts: Many advanced integration apps utilize a "clearing account" (a bank-type account in QuickBooks) to handle the daily flow of funds.
- Gross sales and other income items go into the clearing account.
- Fees, refunds, and other deductions go out of the clearing account.
- The net payout from Shopify (what actually hits your bank) is then transferred from this clearing account to your actual bank account in QuickBooks.
- This method makes bank reconciliation much cleaner, as you reconcile the single net deposit from Shopify in your bank feed, knowing the clearing account holds all the underlying detail.
2. Inventory Management and Cost of Goods Sold (COGS)
Accurate inventory costing is vital for profitability analysis.
- SKU Matching: Ensure your Product SKUs in Shopify precisely match your Product/Service items in QuickBooks. This is non-negotiable for accurate inventory sync.
- Inventory Asset Account: Map your Shopify products to an "Inventory Asset" account (an "Other Current Asset" type) in QuickBooks.
- Cost of Goods Sold (COGS) Account: When a product is sold in Shopify, the integration should ideally record the cost of that product (its COGS) as an expense in QuickBooks, reducing your inventory asset. This requires your product costs to be entered in either Shopify or QuickBooks and correctly mapped.
- Inventory Sync Direction: Decide if inventory levels sync from Shopify to QuickBooks, QuickBooks to Shopify, or bi-directionally. Most often, Shopify is the master for current inventory, and QuickBooks tracks the financial value.
3. Refunds and Returns
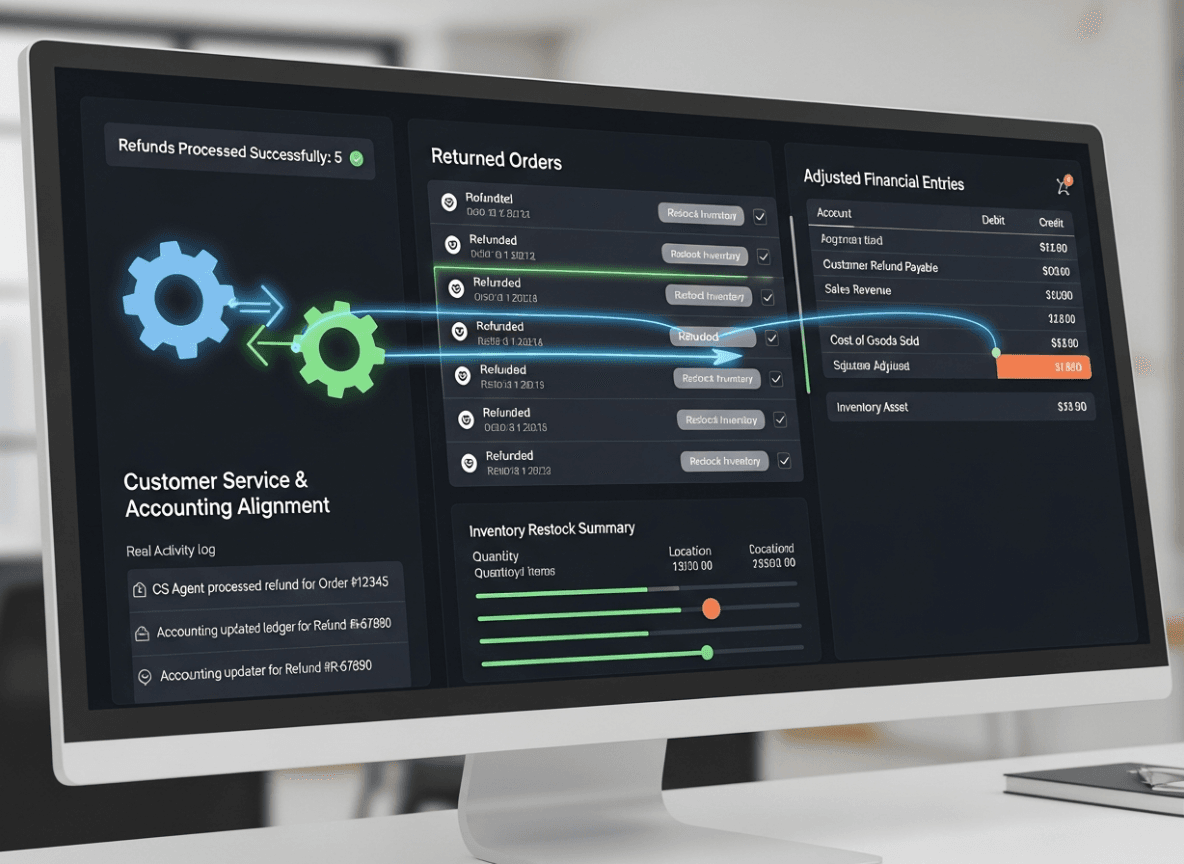
Handling refunds correctly is crucial for accurate sales reporting and tax liabilities.
- Ensure your integration processes refunds in a way that:
- Reduces your sales revenue in QuickBooks for the returned items.
- Adjusts the associated sales tax liability.
- Records any restocking fees or original shipping costs as per your policy.
- If inventory is returned to stock, it should increase your inventory asset.
4. Sales Tax Compliance
Sales tax rules can be complex, especially with varying nexus requirements.
- Automated Tax Calculation: Rely on Shopify's built-in tax engine for calculating sales tax at the point of sale.
- Accurate Mapping: Map Shopify's sales tax collections to the correct sales tax liability accounts in QuickBooks, broken down by jurisdiction if necessary.
- Tax Reports: Use QuickBooks' sales tax reports, which are fed by the integration, to accurately file your sales tax returns.
5. Multi-Currency Transactions
If your Shopify store sells in multiple currencies, this adds a layer of complexity.
- QuickBooks Online Advanced: QuickBooks Online Advanced offers multi-currency features that are essential for handling this.
- App Compatibility: Ensure your chosen integration app explicitly supports multi-currency transactions and can correctly convert and record them in your home currency within QuickBooks.
6. Dealing with Shopify Flow and Custom Orders
If you use Shopify Flow for custom workflows or have specific needs for custom orders:
- App Limitations: Standard integration apps might not fully capture all the nuances of highly customized orders or unique payment scenarios generated by Shopify Flow.
- Manual Adjustments/Custom Solution: You might need to make manual adjustments in QuickBooks or consider a more custom integration solution if these custom orders represent a significant portion of your business.
7. Reconciliation Strategy
Beyond initial setup, having a robust reconciliation strategy is key.
- Daily/Weekly Reviews: Briefly review the synced transactions daily or weekly. Catching errors early is much easier than fixing them months later.
- Monthly Bank Reconciliation: Always reconcile your actual bank statements with your QuickBooks bank accounts. This is the ultimate check that money in and out matches reality.
- Monthly Shopify Payout Reconciliation: Match each Shopify payout (the amount transferred to your bank) with the corresponding entries in your QuickBooks clearing account or bank account. Ensure the net amount matches perfectly.
- Periodic Inventory Audit: If syncing inventory, conduct periodic physical inventory counts to compare with your QuickBooks inventory asset reports.
8. User Permissions
- Limit Access: Grant only the necessary permissions to the integration app within both Shopify and QuickBooks.
- Dedicated User: For some custom setups, creating a dedicated "integration user" in QuickBooks can help track changes made by the automation.
9. Stay Updated
- App Updates: Keep your integration app updated to the latest version to benefit from new features, bug fixes, and compatibility improvements.
- Platform Changes: Be aware of any significant changes or updates announced by Shopify or Intuit, as they might impact your integration.
10. Document Your Process
- Create a simple document outlining how your integration is set up:
- Which app is used.
- Key account mappings.
- Sync frequency and rules.
- Reconciliation steps.
- This is invaluable for training new staff or troubleshooting.
By incorporating these advanced considerations and best practices, you can move beyond basic synchronization to achieve a truly automated, accurate, and insightful financial management system for your Shopify e-commerce business.
VI. Troubleshooting Common Shopify QuickBooks Integration Issues
Even with careful setup, integration issues can sometimes arise. Knowing how to identify and troubleshoot common problems can save you a lot of time and frustration.
1. Transactions Not Syncing or Missing Data
Symptoms:
- Recent Shopify orders don't appear in QuickBooks.
- Certain transaction details (e.g., shipping charges, discounts) are missing from QuickBooks entries.
- Sync errors reported by the integration app.
Troubleshooting Steps:
- Check Sync Log/Dashboard: Most integration apps have a dashboard or log that shows the status of recent syncs and any errors encountered. This is your first stop.
- Review App Settings:
- Has the sync been paused?
- Are the correct date ranges selected for synchronization?
- Are there any filters preventing specific orders from syncing (e.g., only paid orders)?
- Check API Connections:
- Has the connection to Shopify or QuickBooks been revoked or expired? Re-authenticate the connection within the app.
- Are there any outages reported by Shopify, QuickBooks, or the integration app provider?
- Manual Trigger/Force Sync: Many apps allow you to manually trigger a sync for a specific period or individual transactions.
- Contact App Support: If the logs don't provide a clear answer, reach out to the integration app's customer support. Provide them with specific order numbers and error messages.
2. Incorrect Account Mapping
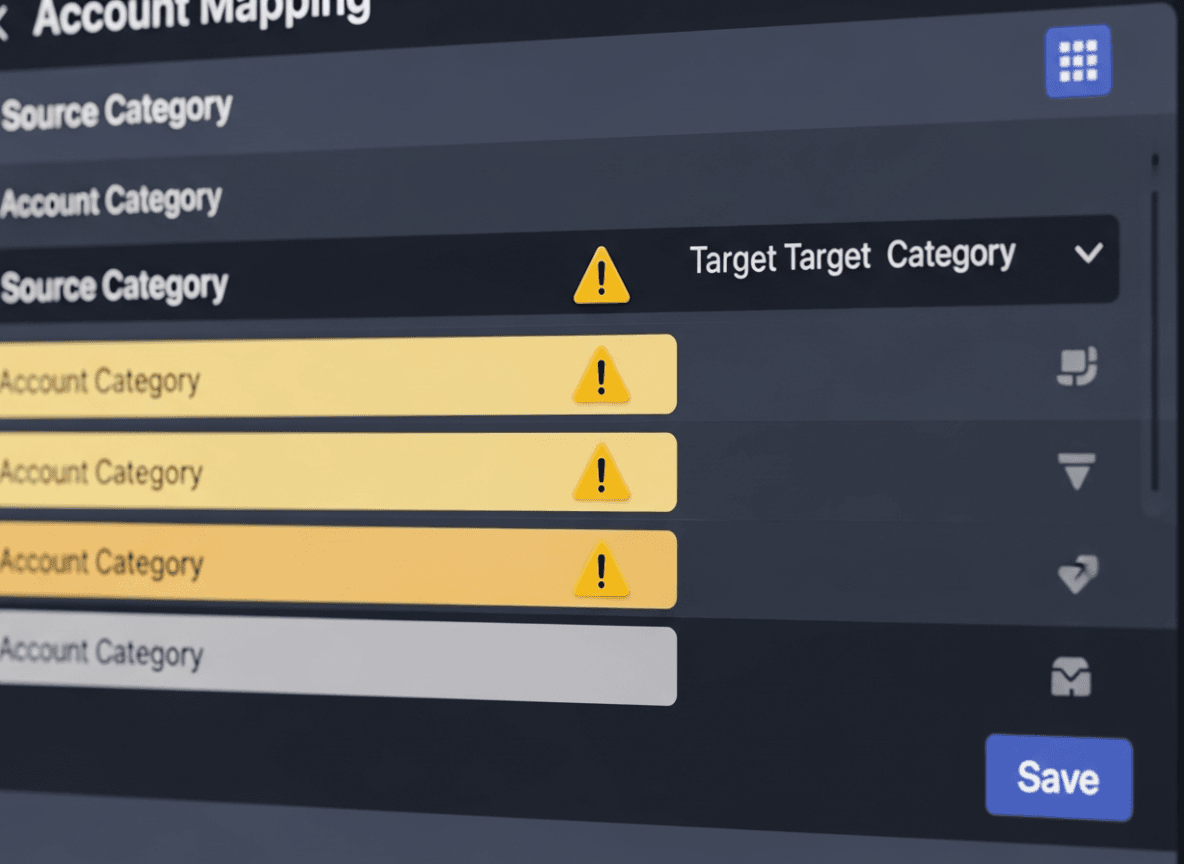
Symptoms:
- Sales revenue appearing in an expense account.
- Sales tax hitting a general income account instead of a liability account.
- Payment gateway fees not being recorded correctly.
Troubleshooting Steps:
- Review App's Account Mapping: Go back to the integration app's setup and carefully re-examine how each Shopify financial component (sales, shipping, tax, fees, discounts, refunds, payment methods) is mapped to your QuickBooks Chart of Accounts.
- Verify QuickBooks Account Types: Ensure the mapped QuickBooks accounts are of the correct type (e.g., income for sales, liability for sales tax, expense for fees, bank for clearing accounts).
- Re-sync Affected Transactions: After correcting the mapping, try to re-sync the transactions that were incorrectly recorded. Some apps allow you to "undo" or "delete" incorrectly synced transactions from QuickBooks and then re-sync them. Be cautious with deleting data in QuickBooks.
3. Bank Reconciliation Issues
Symptoms:
- The net amount deposited into your bank account from Shopify doesn't match the corresponding entry in QuickBooks.
- Difficulty reconciling the "Shopify Clearing Account."
Troubleshooting Steps:
- Understand Shopify Payout Reports: Shopify provides detailed payout reports showing gross sales, less refunds, less fees, to arrive at the net payout. Compare this report with what the integration records in QuickBooks.
- Verify Fee and Refund Recording: Ensure the integration is correctly capturing all Shopify fees and refunds as separate items (or summarized correctly) before calculating the net deposit.
- Check Date Ranges: Make sure the dates of transactions in QuickBooks align with the payout period from Shopify.
- Review Clearing Account Logic: If using a clearing account, verify that all debits (sales, shipping) and credits (fees, refunds) are correctly flowing in and out of it before the net transfer to the bank account.
- Look for Duplicates: Sometimes, transactions might be manually entered in QuickBooks and automatically synced, leading to duplicates. Check for these and delete manual entries if the auto-sync is correct.
4. Inventory Discrepancies
Symptoms:
- Inventory counts in Shopify don't match QuickBooks.
- Cost of Goods Sold (COGS) seems inaccurate.
Troubleshooting Steps:
- SKU Matching: Double-check that Product SKUs are identical between Shopify and QuickBooks. A mismatch will prevent accurate inventory updates.
- Initial Inventory Sync: Ensure that initial inventory levels were correctly synced when the integration was first set up.
- COGS Data: Verify that the cost price for each product is accurately entered in either Shopify or QuickBooks, depending on which system the integration uses as the source for COGS.
- Other Sales Channels: If you sell on platforms other than Shopify, those sales (and associated inventory deductions) must also be accounted for in QuickBooks. The Shopify integration only handles Shopify sales.
- Integration Settings: Confirm the app's settings for inventory synchronization (e.g., direction of sync, frequency).
5. Sales Tax Reporting Errors
Symptoms:
- Sales tax reports in QuickBooks don't match Shopify's tax reports.
- Incorrect sales tax amounts being recorded.
Troubleshooting Steps:
- Tax Mapping: Verify that the sales tax rates and components from Shopify are correctly mapped to your sales tax items and agencies in QuickBooks.
- Tax Exemptions: Ensure any tax-exempt sales are correctly identified and recorded as such by the integration.
- Jurisdiction Differences: Confirm that the way sales tax jurisdictions are handled in Shopify aligns with your setup in QuickBooks.
General Tips for Troubleshooting:
- Take Screenshots: When contacting support, provide clear screenshots of the issue in both Shopify and QuickBooks, as well as any error messages from the integration app.
- Be Specific: Provide specific order numbers, transaction dates, and amounts when describing problems.
- Test with Small Batches: If possible, test new configurations or re-syncs with a small, manageable batch of transactions first, rather than large historical data.
- Clear Browser Cache: Sometimes browser issues can interfere with web-based app interfaces.
- Check Permissions: Ensure your user account (or the app's connection) has the necessary permissions in both Shopify and QuickBooks.
By systematically working through these troubleshooting steps, you can often pinpoint and resolve most common integration issues, ensuring your Shopify and QuickBooks systems remain harmoniously connected.